Whether we like it or not, the beginning of a new console generation brings both trouble and opportunities for PC gamers. Those shiny, new consoles are outfitted with mid to enthusiast-class hardware, driving PC system requirements up. You'll find that, all of a sudden, AAA games aren't running at a flawless 60 FPS on a mainstream GPU anymore. So while the average new game may be more resource intensive, that also means titles can take better advantage of modern PC hardware.
It's been this way for the past few generations. Back in 2005, early-generation Xbox 360 games like F.E.A.R. and The Elder Scrolls IV: Oblivion, punished even top-tier gaming PCs. In 2014, Assassin's Creed: Unity, pegged as Ubisoft's first "true" next-gen game, ran at an appalling 24 FPS at 1440p on the flagship GeForce GTX 980. While Unity certainly isn't representative of the performance profile of all early eighth-gen games, it was markedly harder for PCs to run games that came out after the PS4 and Xbox One than before.
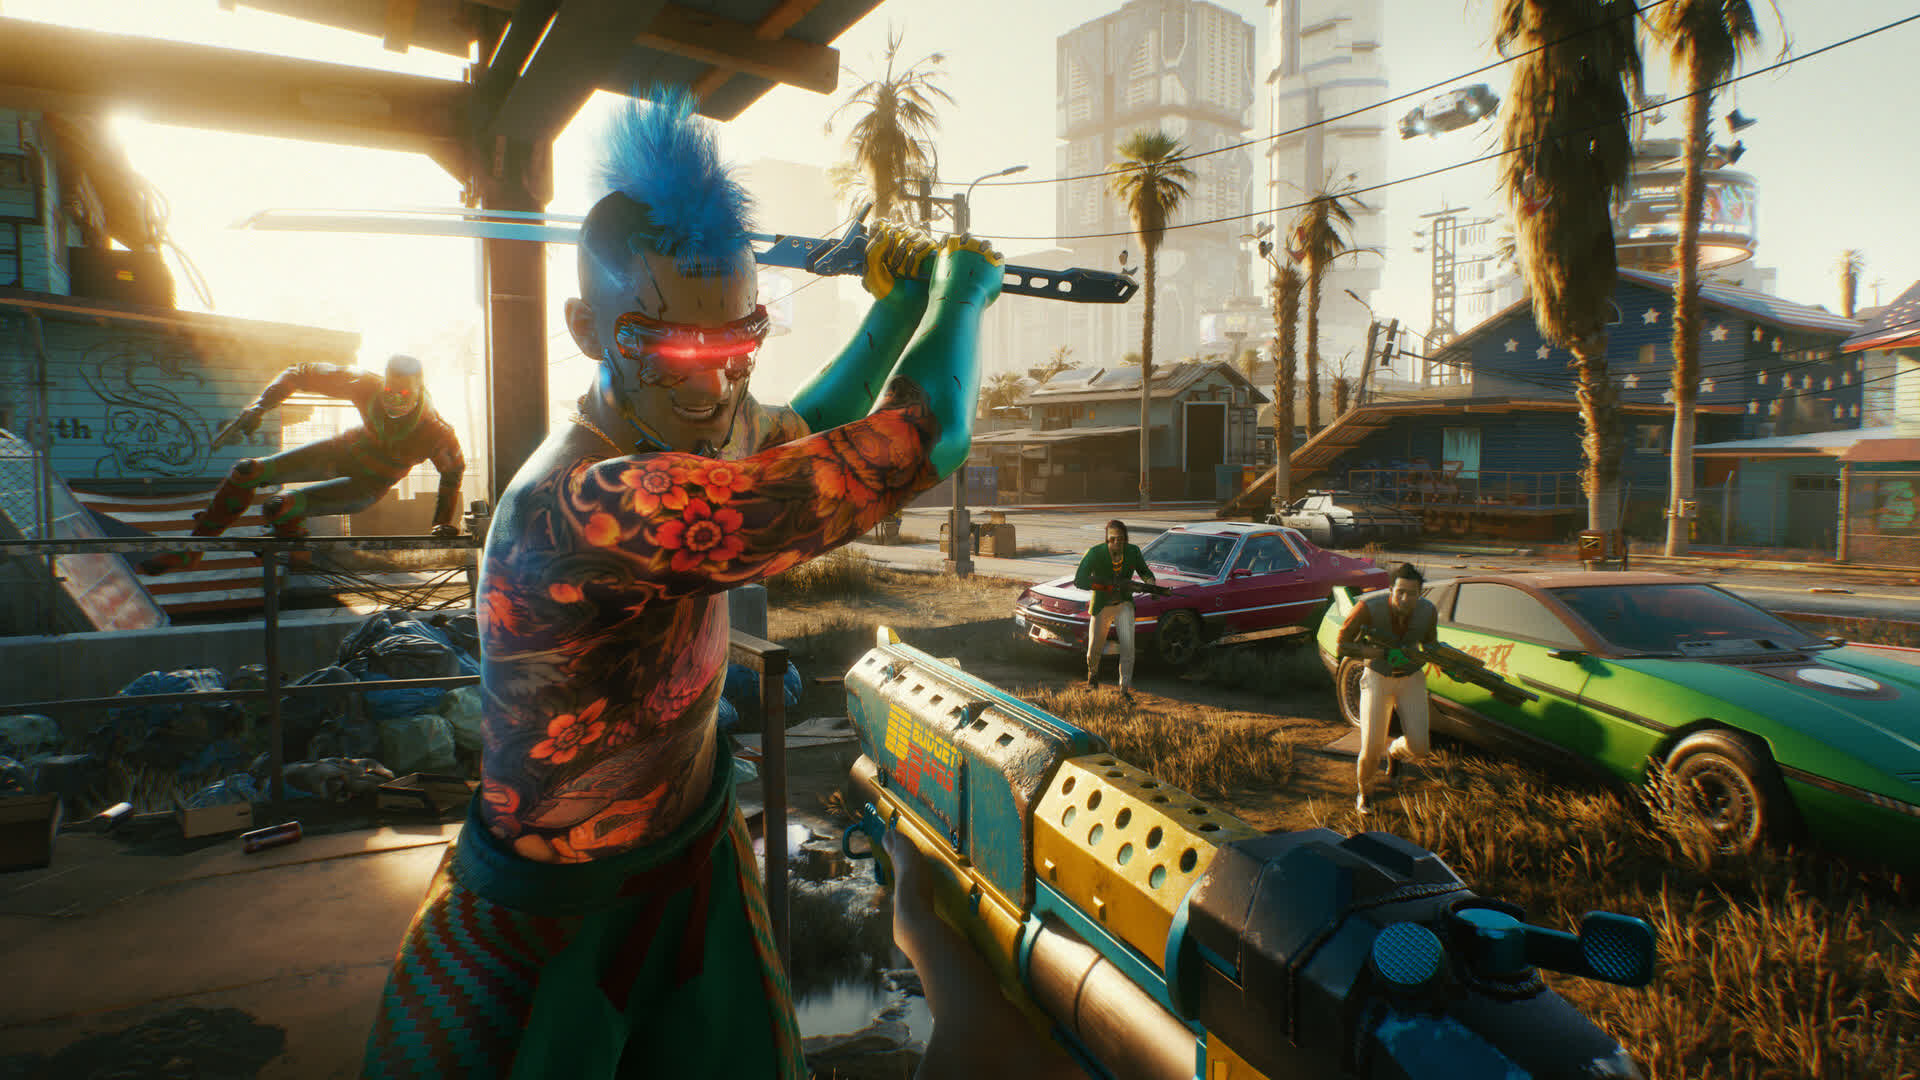
Here at the end of 2020 (as if we don't have enough problems, already), the PlayStation 5 and Xbox Series X have once again driven up the hardware baseline. Modern titles like Assassin's Creed: Valhalla and Cyberpunk 2077 struggle to run well at 4K, even on top-tier systems. And while settings tweaks can help, there's a limit to how much performance you can claw back this way, especially on older platforms.
There is one other way to significantly boost performance: resolution scaling.
Resolution scaling is a great option if you're looking to eke out an additional 10-15% performance after tweaking settings. If you're playing at a higher resolution like 4K, and you combine resolution scaling with image sharpening (see here for GeForce and Radeon solutions), the results are often very close to native.
What custom resolution should you use? This depends on the native resolution of your monitor. A resolution scale of 83 percent is typically a good compromise between image quality and performance. At 4K, this means a custom resolution of 3200 x 1800. At 1440p, we're talking about 2133 x 1200. At 1080p, pixel density on most displays is already quite low, so we'd avoid scaling there if at all possible.
If you're really short on performance, a .83 percent res scale at 1080p translates to 1600 x 900. Keep in mind that this resolution scale number is not set in stone. You can go higher or lower, depending on your performance expectations, your native resolution, and your monitor's pixel density. To find other custom resolutions, simply multiply your native resolution by the scale factor on both axis.
While many games now offer resolution scaling options in their settings menus, you'll need to set up custom resolutions in Windows for full compatibility. We'll walk you through how to do that in this piece, and share 4K benchmarks highlighting the performance impact. Our test rig features a GeForce RTX 3080 and a Ryzen 9 3900X. Despite these formidable specs, depending on the game we can become GPU limited at 4K and resolution scaling yields a considerable performance boost.
As a brief side note, Nvidia's DLSS is similar to resolution scaling in that it also renders the game at a lower internal resolution but then upscales it and enhances the image using temporal anti-aliasing (TAA) and deep learning. A proper DLSS 2.0 implementation should be better than plain resolution scaling, but it's supported on a per game basis. We have run some DLSS tests for this feature as well.
Both Nvidia and AMD offer custom resolution options in their respective control panels. But for this article we'll be using the platform-agnostic CRU (Custom Resolution Utility) instead. We've found that custom resolutions in CRU tend to have fewer compatibility issues and reliably show up in all games, unlike the control panel custom resolution options. Let's get started!
1. Download and run CRU
CRU creator ToastyX has a post on the Monitor Tests forums where he updates the latest versions of CRU. You can also download it from TechSpot. You don't need to install CRU, just unzip the files in a folder and you're good to go.
2. Run CRU as an administrator
Under "Detailed Resolutions," click on Add.
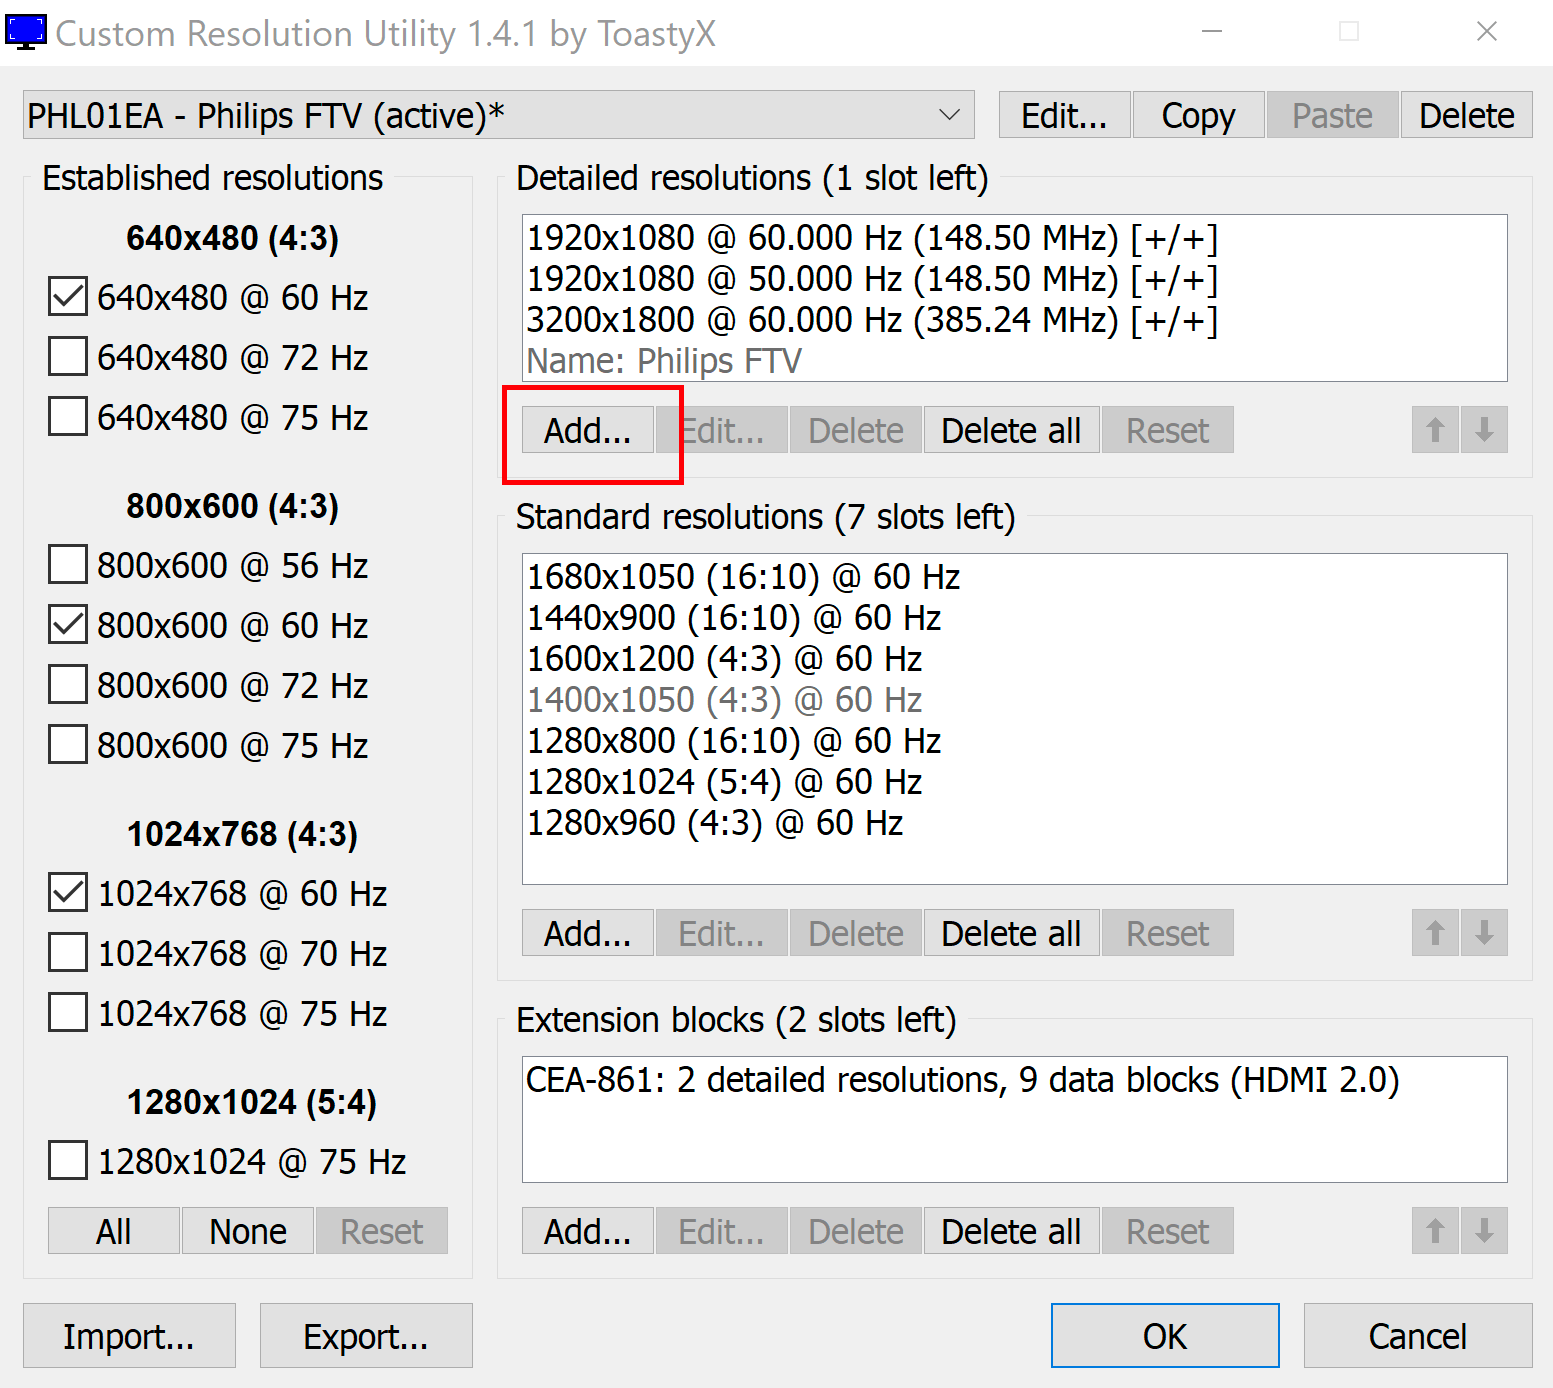
This will take you to a new Detailed Resolutions window. Here, enter your custom resolution in the two boxes highlighted below.
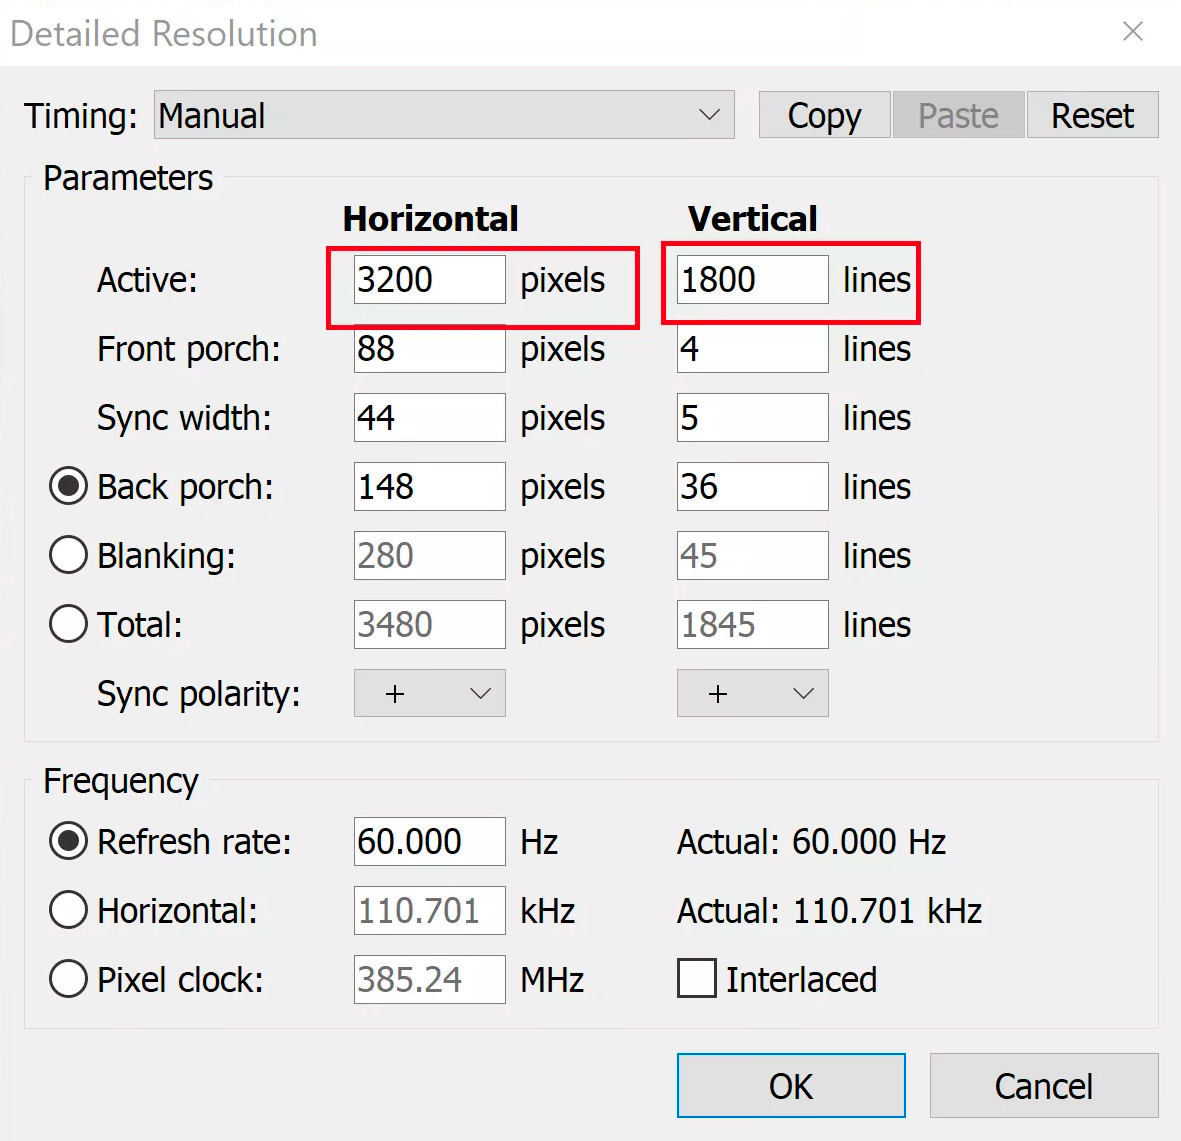
Enter the resolution width and height. You don't need to touch any other settings.
If you want, you can set a custom refresh rate as well. That's another potential performance-boosting tip we'll talk about later in this article. Once you're done, click OK and exit the app.
3. Restart your graphics driver
In the CRU folder, you will find a file called restart64.exe. Run that as administrator. This will restart your graphics driver. You will see your screen blink and some things will briefly break (especially hardware-accelerated apps, overlays, games, or Steam). This is normal and you'll just need to run them again.
The new custom resolution will show up globally in Windows settings and in all apps and games that allow you to change the resolution.
Pro tip: if you're gaming on a TV or a budget monitor, make sure to enable GPU scaling in Nvidia/AMD control panels. While display scaling is marginally (circa 1 ms) faster, low-end TVs and monitors do a terrible job of scaling, significantly affecting image quality with custom resolutions.
Testing resolution scaling
Our test rig:
- CPU: AMD Ryzen 9 3900X
- GPU: Nvidia GeForce RTX 3080
- RAM: 2 x 8GB 3600MHz DDR4
- Motherboard: MSI MAG X570 Tomahawk WiFi
- Storage: 2 x 480 GB NVMe SSDs
- PSU: XPG Core Reactor 850W
Just how much of a performance gain can you expect from resolution scaling? At 83 res scaling, you should be getting roughly 15 percent higher frame rates, especially if you're scaling down from a very high resolution.
We tried out resolution scaling in a number of titles including Assassin's Creed: Valhalla, Red Dead Redemption 2, and Borderlands 3, check out the benchmarks below...
Gearbox's latest shooter is hard on GPUs at top-end settings. We ran the game with the volumetric fog dialed down a notch. Even then, we only average 66 FPS at native 4K, with occasional dips below 60. At 3200 x 1800, we managed an 84 FPS average. This is a remarkable 27 percent higher.
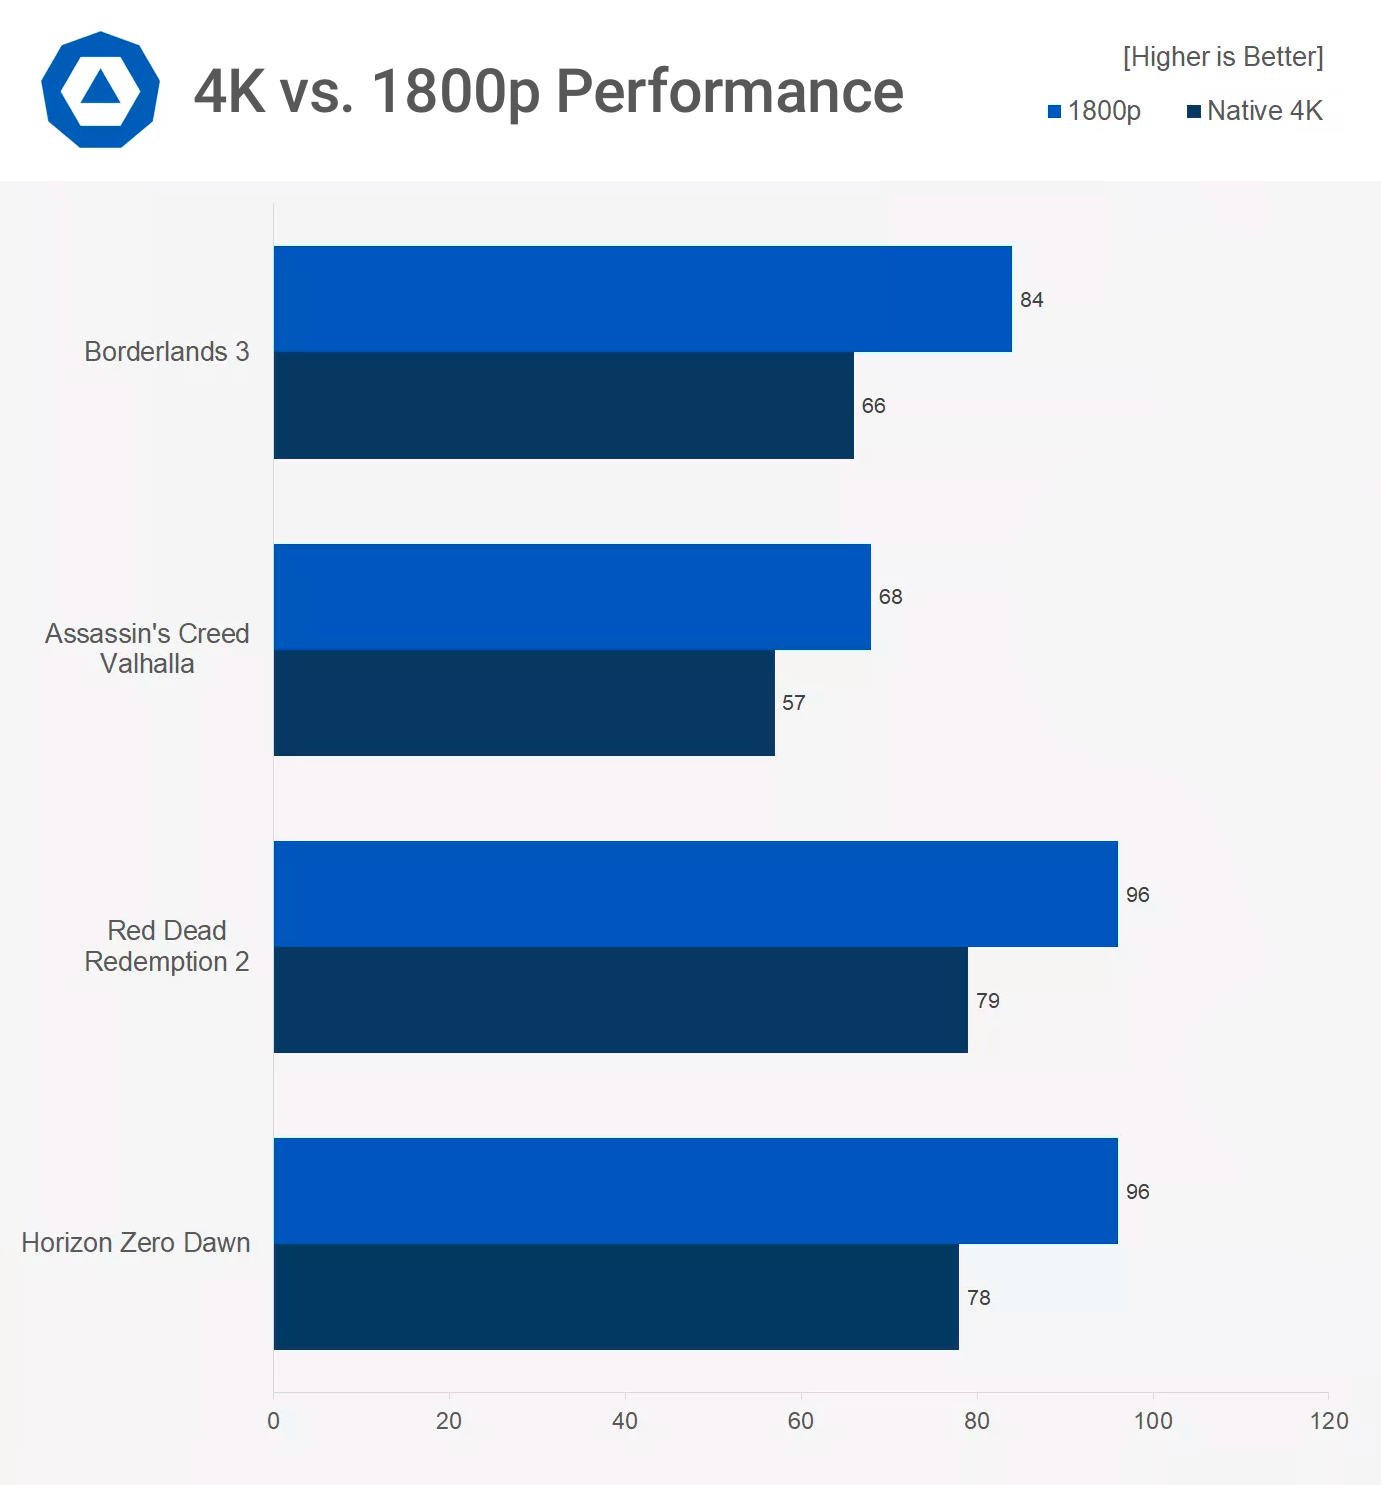
The latest game in the Assassin's Creed franchise was built for the PlayStation 5 and Xbox Series X first. This is a cross-gen title that scales all the way down to the base Xbox One. However, it's punishing at top-end settings. When maxed out, the GeForce RTX 3080 delivers a 50 FPS experience. Even with our custom settings, the game only managed 57 FPS at native resolution. At 1800p, though, the frame rate shot up to 68 FPS, a 19 percent boost. This made a 60 FPS lock far more feasible.
Rockstar's Red Dead Redemption 2 features one of the most detailed open worlds we've seen to date. The game ran well at max settings, but settings tweaks can go a long way to improve the state of affairs. With our custom settings, the game already ran at a very respectable 79 FPS at native 4K. Resolution scaling pushed things further. At 1800p, we saw an average frame rate of 96 FPS. This opens the door to enabling extremely demanding settings like Tree Tessellation that we'd otherwise leave off.
Horizon Zero Dawn was a PlayStation 4 exclusive that stunned at launch. On PC, character and environment quality holds up against the best of this year's AAA titles: it actually looks and runs better than Assassin's Creed: Valhalla. Nevertheless, you will need an RTX 3080 or better to max this game out at 4K. On other cards, resolution scaling is a viable option to boost performance.
At native 4K, our system manages a smooth 78 FPS, but there are gains to be made here. At 1800p, we see a remarkable 96 FPS average. While this appears like a dead ringer for RDR2's performance profile, minimums are far better in Horizon Zero Dawn: at 1800p, a 1% low of 77 FPS, meaning effectively no dips below 60 FPS. If you have a pixel-dense 4K high refresh monitor, resolution scaling opens the door to high frame rate gaming in this title.
Significant performance gains
As expected, all games we tested showed significant frame rate gains when playing at a lower resolution. A 17% reduction in pixel count netted up to a 27 percent improvement to the average frame rates. Modern game engines often tie certain visual effects to the frame buffer resolution. For example, at native 4K, quarter-resolution alpha effects would render at 1920 x 1080, while they'd render in at 1600 x 900 if you're running at 3200 x 1800.
What about DLSS 2.0?
We also tested DLSS 2.0 in Watch Dogs: Legion (and no, Nvidia didn't make us do it). Conventional resolution scaling isn't perfect and does have an image quality impact: you're rendering fewer pixels. This is particularly noticeable when it comes to distant and high-frequency detail. Sharpening can help, but it's not a magic bullet.
DLSS 2.0, well.... kind of is. As our previous tests with Wolfenstein: Youngblood and Control demonstrated. By leveraging RTX tensor cores, the DLSS AI algorithm is able to start with a lower-resolution input and effectively recreate missing pixels, to the point that high-quality is indistinguishable from native rendering. At the lower end, image quality is sacrificed, but as you'll see, the performance gains are tremendous.
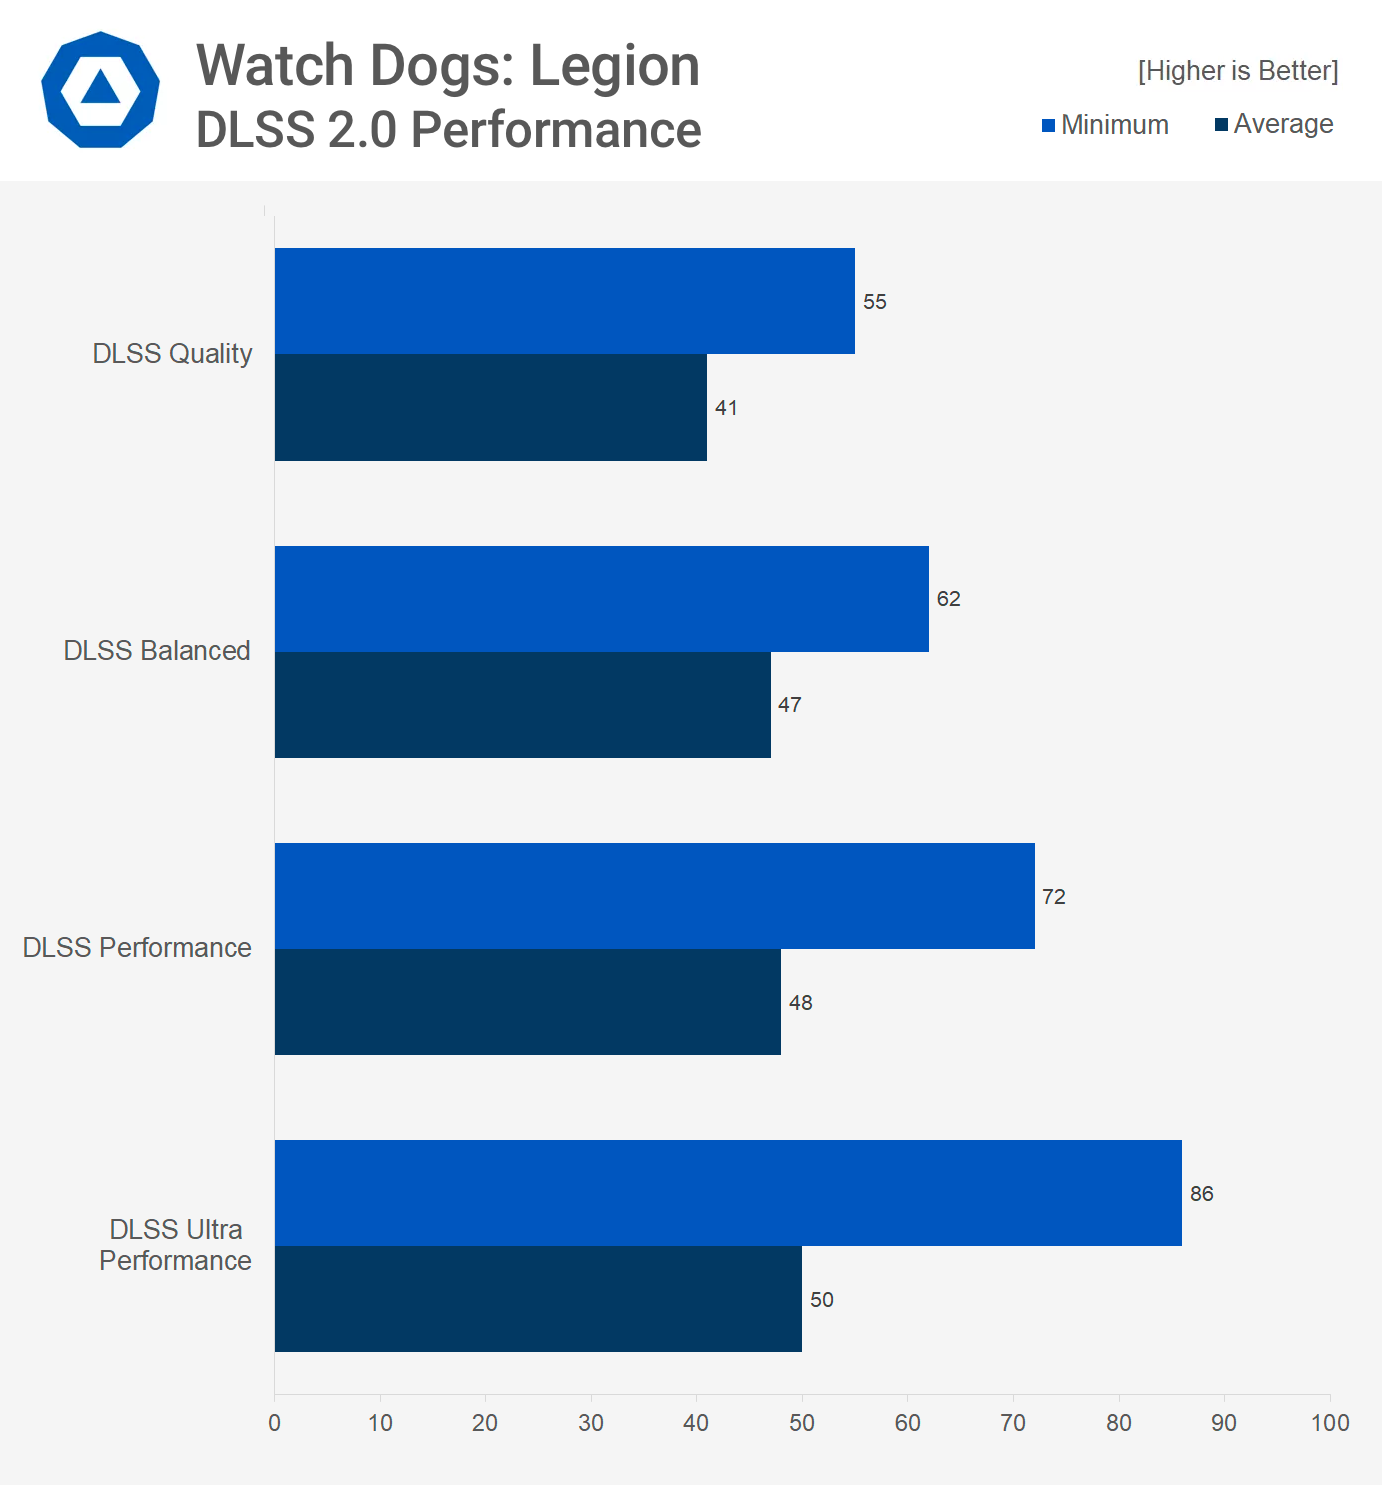
With DLSS set to quality, we averaged 55 FPS. This mode offers image quality that's actually marginally better than native res with TAA. It also runs far, far better. Nevertheless, we're in sub-60 FPS territory here, with occasional dips below 50.
DLSS Balanced offers a very, well, balanced performance profile. The 62 FPS average with 1% lows in the 50s isn't ideal, but it pairs well with the game's Adaptive V-Sync mode.
With DLSS set to performance mode, we do see image quality take a bit of a hit. However, the average frame rate shoots up to 72 FPS, with a 60 FPS 1 percent low. If you're looking for a smooth 60 FPS lock, Performance mode is the way to go. Lastly, we tried out DLSS Ultra Performance mode, but we really wouldn't suggest using it.
Nvidia claims that DLSS Ultra Performance is only meant for 8K displays, and in this case, it's more than just marketing speak. With Ultra Performance mode enabled at 4K, the game is upscaling from a mere 720p. While still frames look surprisingly decent, ghosting and artifacts impact visual quality as soon as you pan the camera.
Ultra Performance netted us an 86 FPS average, with a 66 FPS 1%. That's a decent bump up from Performance mode, but the hit to image quality just isn't worth it.
Bonus round: Custom refresh rates
The problem with sub-60 FPS averages isn't so much lag as it is stutter. When your frame rate fluctuates between the mid-50s and low-60s, frame pacing is constantly off-kilter, leading to a lower perceived frame rate. If you're unable to hit 60 FPS at native res, but also unwilling to use a custom resolution, there is a third option: custom refresh rates. Do note this is not for everybody (as in, not everybody will like the end result), but it's worth trying if your GPU doesn't fully get you there.
CRU's detailed resolution menu lets you change the refresh rate as well as the screen resolution. If you want to set a custom refresh rate, follow the same custom resolution instructions, but instead of inputting a custom resolution, enter a custom refresh rate.
We've found that 55 Hz and 50 Hz are great options. 55 Hz is virtually indistinguishable from 60 Hz. However, it's a 10 percent lower performance target. 50 Hz is less responsive. However, it's far smoother than a console-ish 30 Hz. It also gives your system 10 FPS of headroom when you try to lock to the refresh rate for a consistent experience. In Cyberpunk 2077, I've found that a 50 Hz refresh rate offers a far smoother, more consistent experience than the 50-60 FPS figures we otherwise get.


