Gigabytes are cheaper than ever but they can also be the sort of thing where the more you have, the more you tend to consume, and it doesn't take long for the terabytes to fly by if you spend a lot of time on your computer. Those of you running Windows on a compact SSD probably know what a chore it can be to maintain enough space on your drive between mobile backups, Windows Updates, PC games, media files, and so on.
For this little guide we took it to an extreme by trying to free up space on an old 80GB Intel X25-M G2 solid state drive. Although SSDs have improved by leaps and bounds over the nine years since this Intel drive was released, the device still has plenty of life left according to SSDlife Free and Intel's SSD Toolbox utility.
Spending a mere $50 for a 250GB Samsung 860 Evo drive that is 200% faster than this old drive will eventually be a wise investment, but to be honest apart from frequently running out of storage, we haven't had a reason to upgrade the drive, nor have we installed a new copy of Windows in more than five years. If you're wanting to clean up your drive, this guide will serve you regardless of your current storage solution.
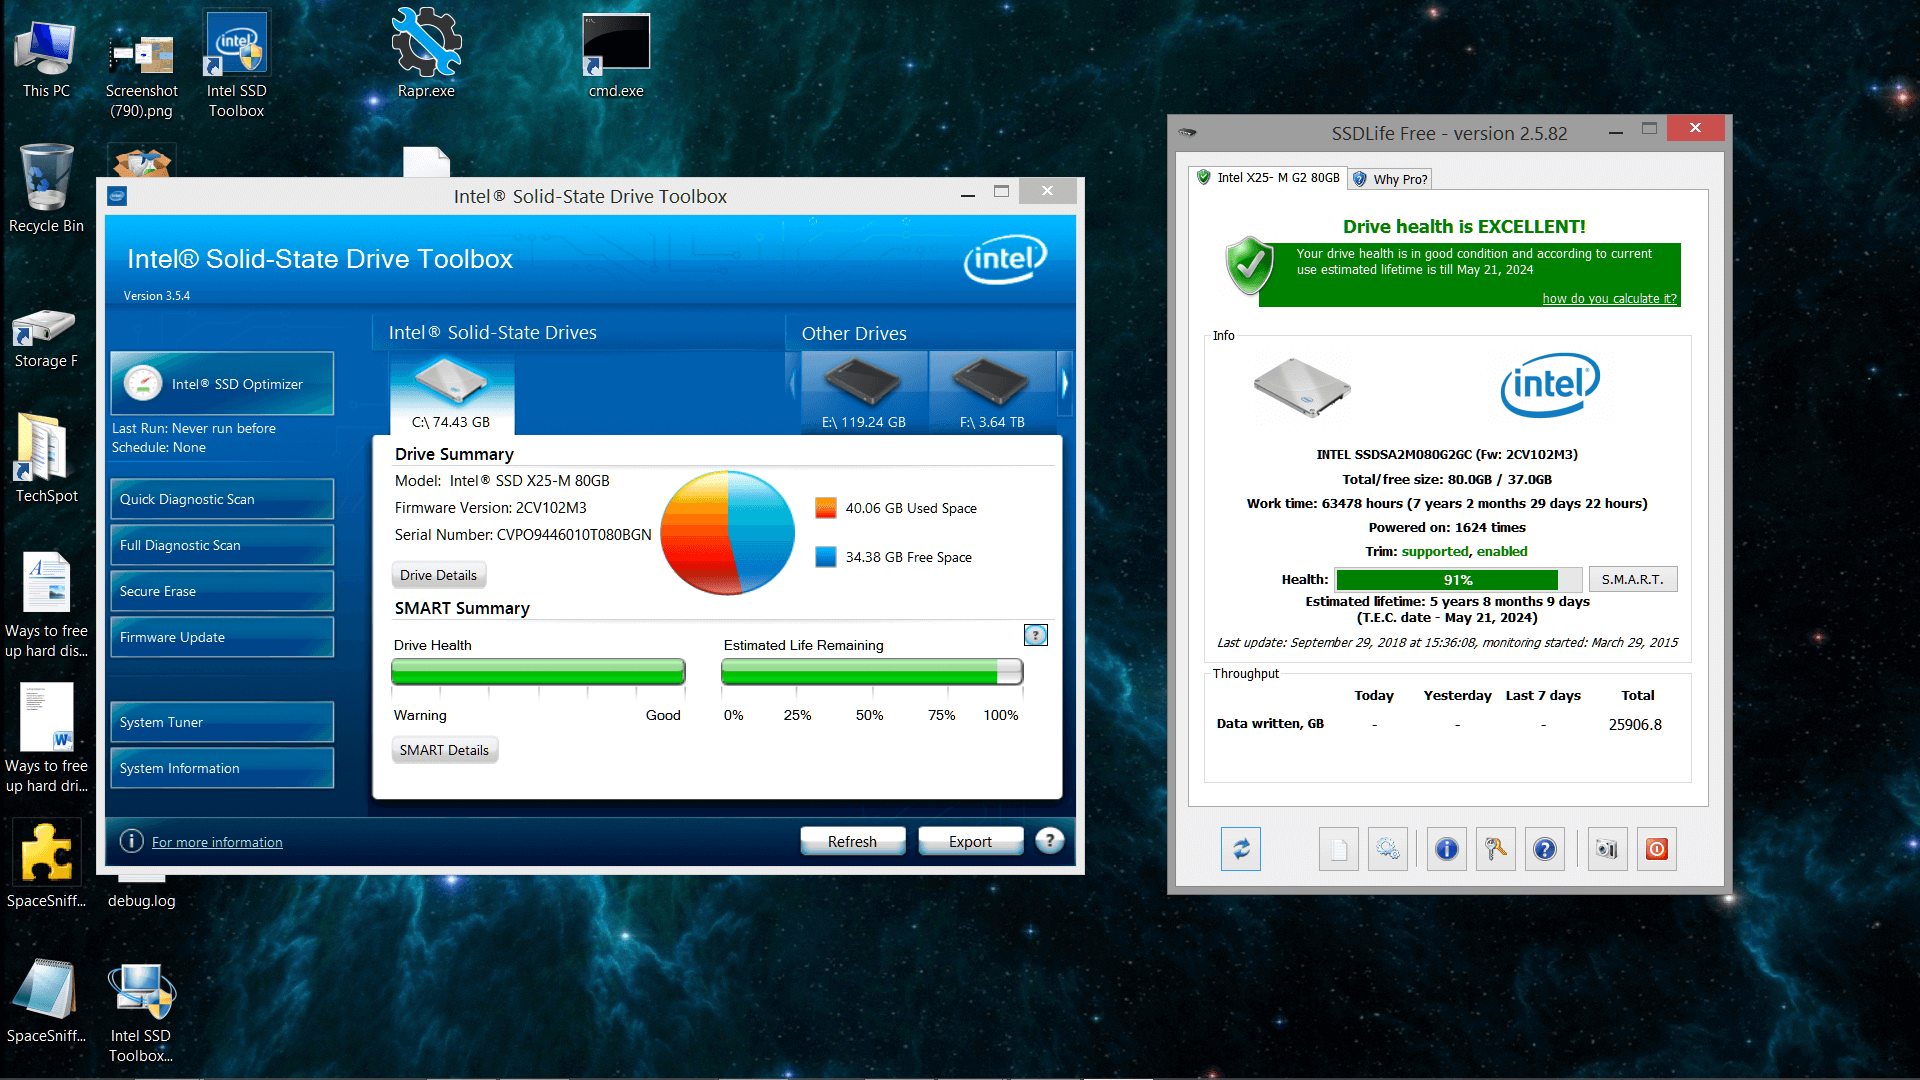
After hovering around <10GB for too long (enough to download or transfer a large file), we set out to regain as much space as we could by moving, compressing and deleting files from all around Windows. In the end, 27GB of storage was recovered (37GB total free) and we took notes along the way to share with you in the event that your Windows drive is also low on space.
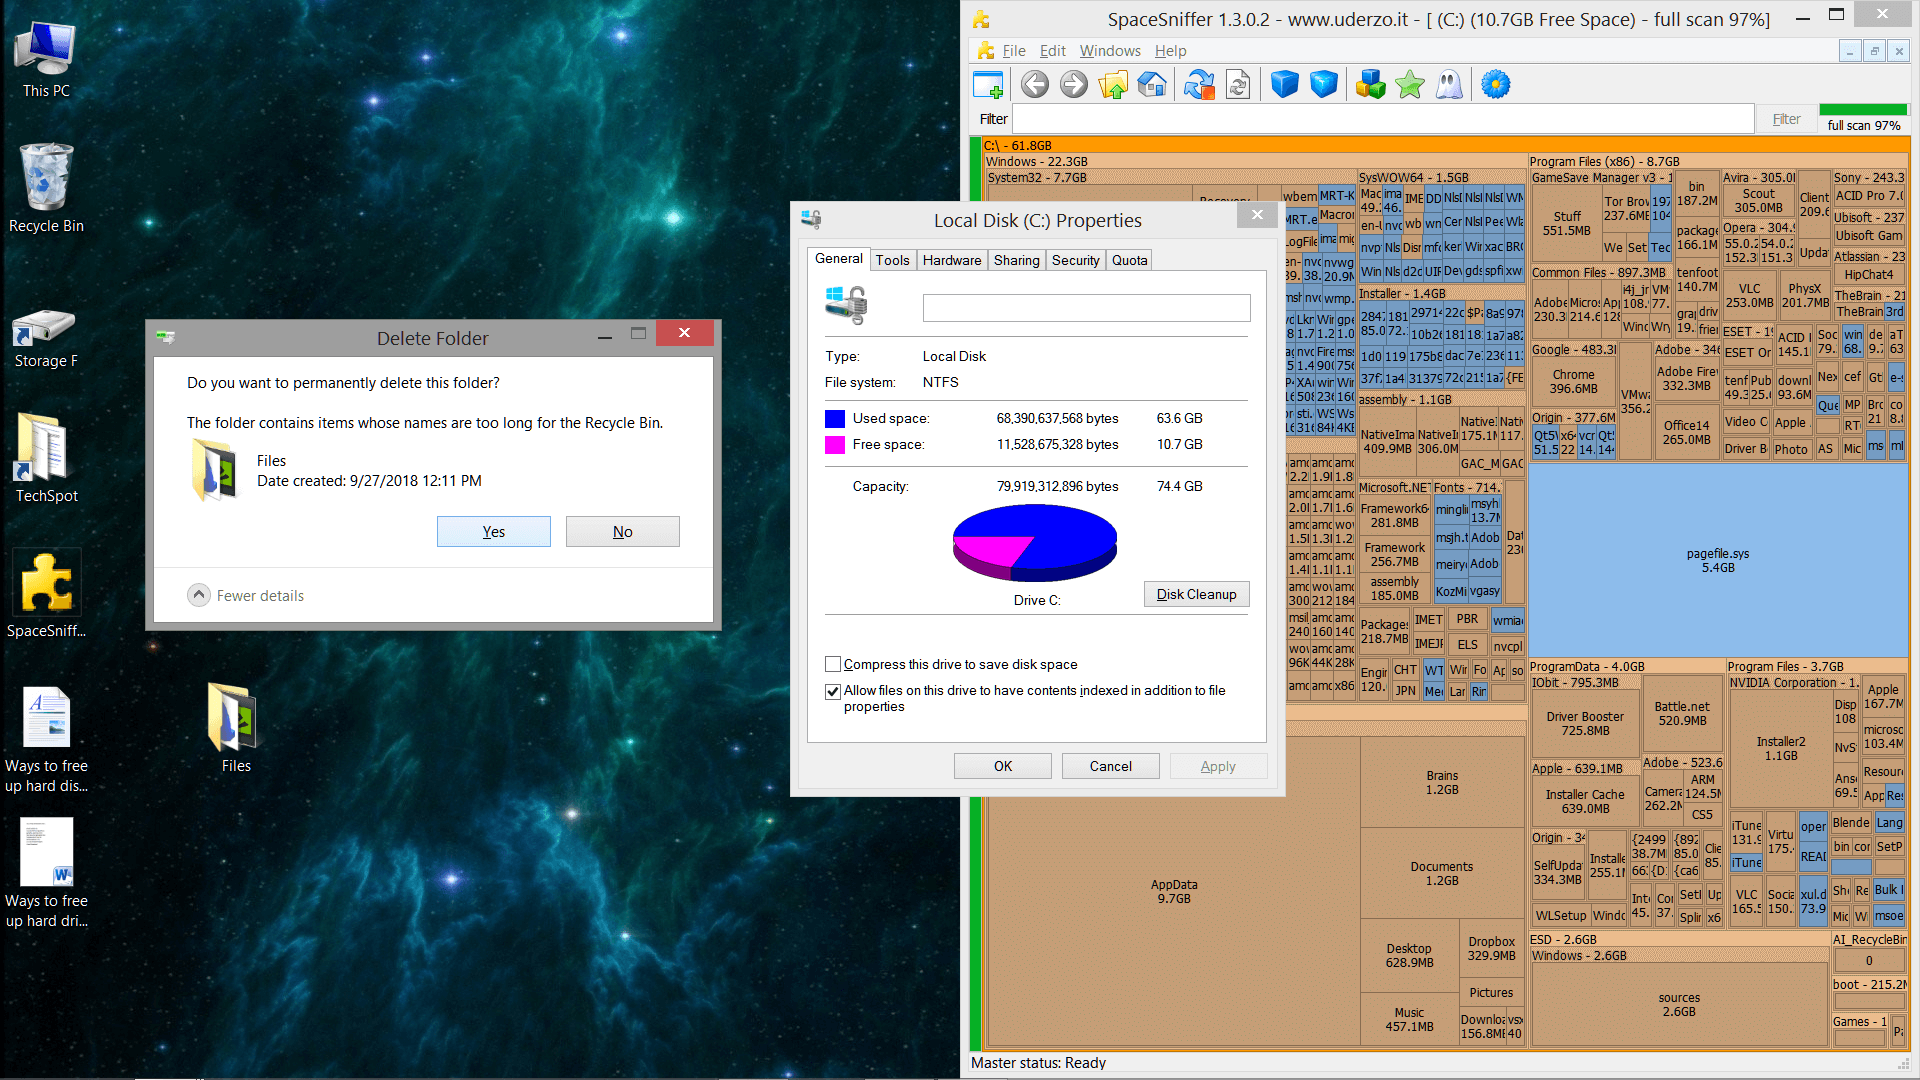
Options are organized from least to most extreme...
Scan for files with Disk Cleanup, and third party tools
Junk file cleaners make it easy to perform a system-wide file cleanup and may be useful for freeing up storage on low capacity SSDs where a few extra gigs can make or break the performance of your operating system. If you've never used a junk file remover before, you might be surprised by how much space can be reclaimed with even Windows' own built-in Disk Cleaner:
- Search the Start Menu for Disk Cleanup
- Open Disk Cleanup and select your main system drive
- The tool will scan your drive for unnecessary files and old cached data
- Clicking "Clean up system files" near the bottom of the window will run a second scan
The result of the scan will display different types of data, from Recycle Bin files to temporary internet cache. If you clicked Clean up system files, "Temporary Windows installation files" among other Windows files will be listed, which could easily be consuming several gigabytes to as much as 25GB or more.
Disk Cleaner can also be launched with advanced options such as the ability to delete files that would be used to reset your operating system (the Windows ESD files) by copying or entering this line into a Command Prompt: cleanmgr /sageset:50
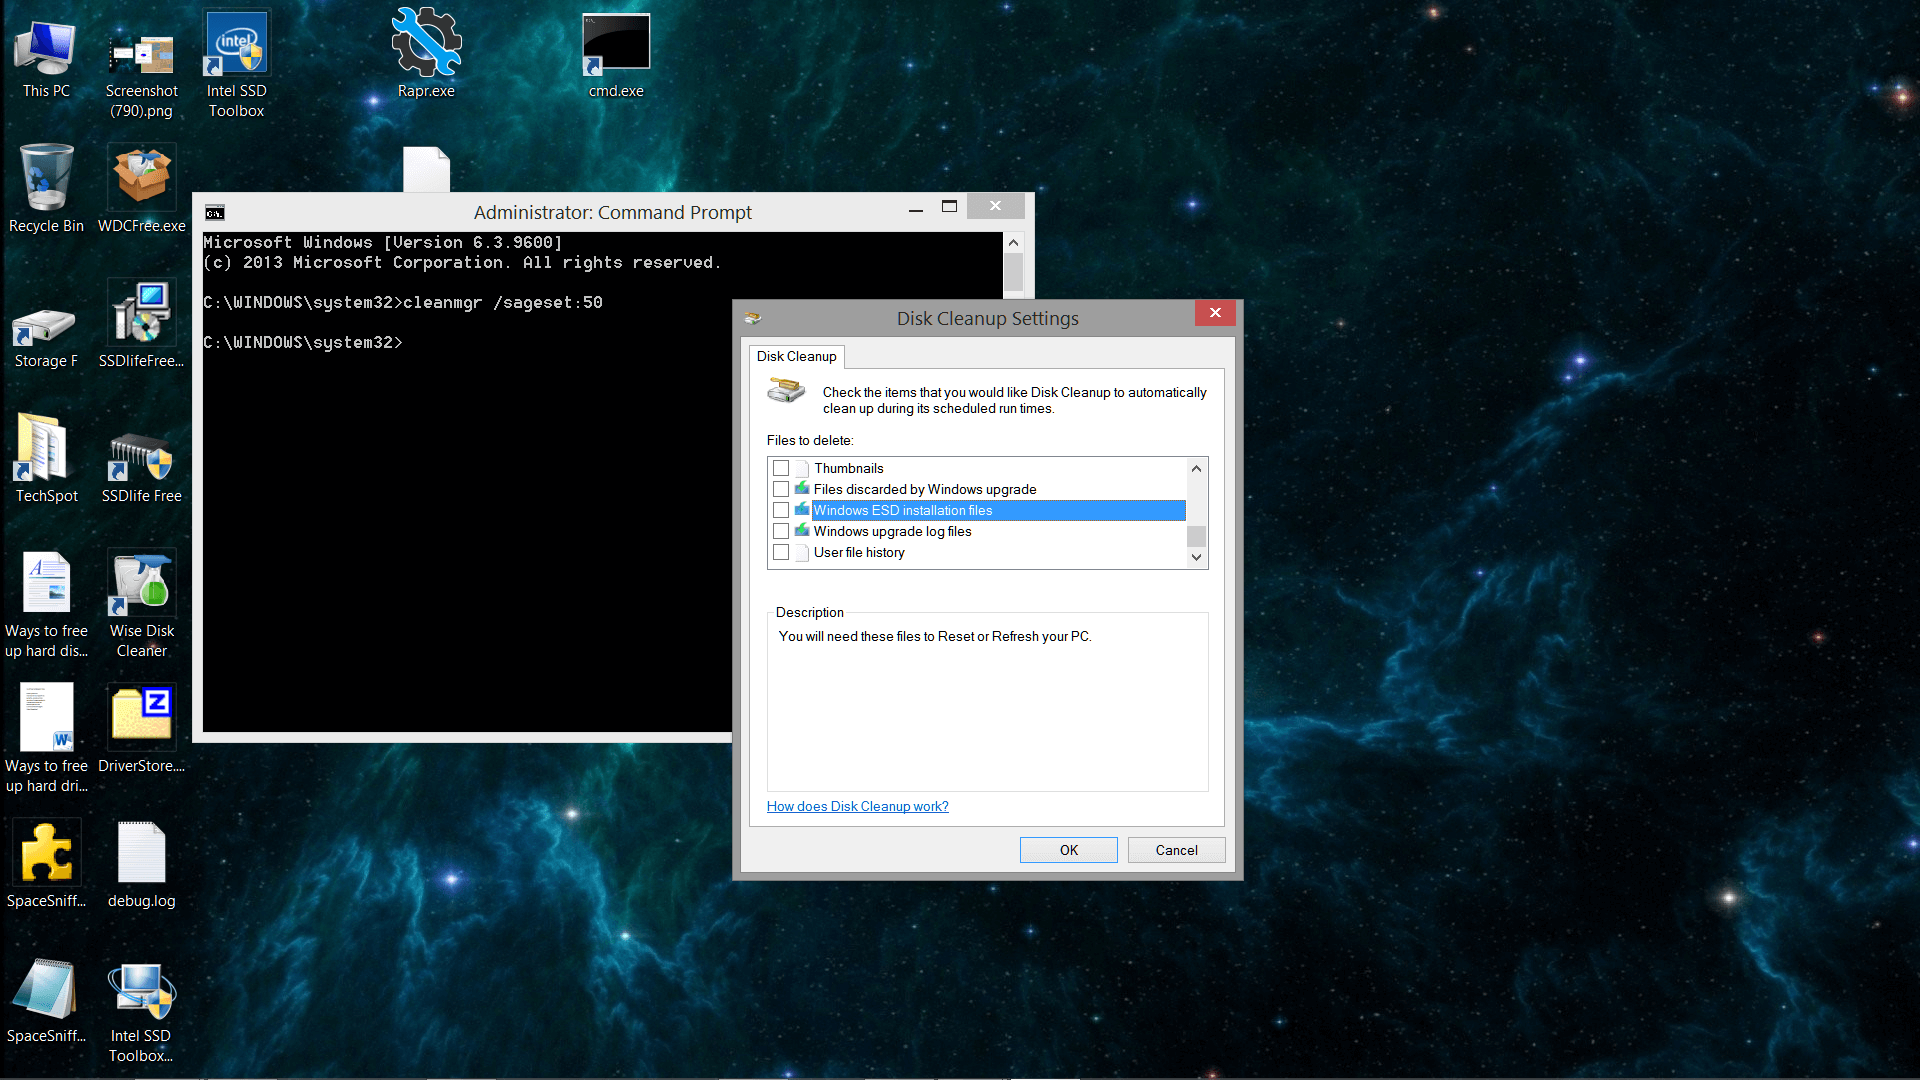
We waited until after manually cleaning everything we could before running Disk Cleanup and the tool only freed 200MB of space, though we've also scanned with the software recently.
After Disk Cleanup, we tested with Wise Disk Cleaner (our recommended CCleaner alternative) and recovered another 2GB+ between the common and advanced cleaners.
Enable Windows 10 Storage Sense
Windows 10 has an automatic disk cleaning service that you can enable in Settings > System > Storage > "Turn on Storage sense." The feature auto-scans for temporary files when you're low on disk space along with removing local copies of OneDrive files and making them online-only after not being used for 30 days.
You can perform that scan manually by clicking "Free up space now" on the Storage Sense settings page and the utility will delete the following data:
- Temporary setup files
- Old indexed content
- System cache files
- Internet cache files
- Device Driver packages
- System downloaded program files
- Dated system log files
- System error memory dump files
- System error minidump files
- Temporary system files
- Dated Windows update temporary files
Manually search for files you no longer need
Deleting duplicate files from your system could recover many gigs of space if only a few large files are found. Unfortunately, without PowerShell scripts or searching for the files via File Explorer, Windows doesn't make it easy to find duplicate files. We recently tested third-party software dedicated to deleting duplicate data and found CloneSpy to have the best combination of providing just enough features with a clutter-free interface.
You may also want to download a disk space analyzer such as SpaceSniffer, which will scan your drive(s) and display all of the files in an interface that makes it easy to see what's occupying the most storage.
Download: SpaceSniffer | Xinorbis | WinDirStat | SequoiaView | TreeSize Free
The Windows User AppData folder (C:\Users\username\AppData\) is a good starting point for finding large amounts of application files for browsers, messengers, game clients and more, including a temp folder that contained 606MB of data on our system.
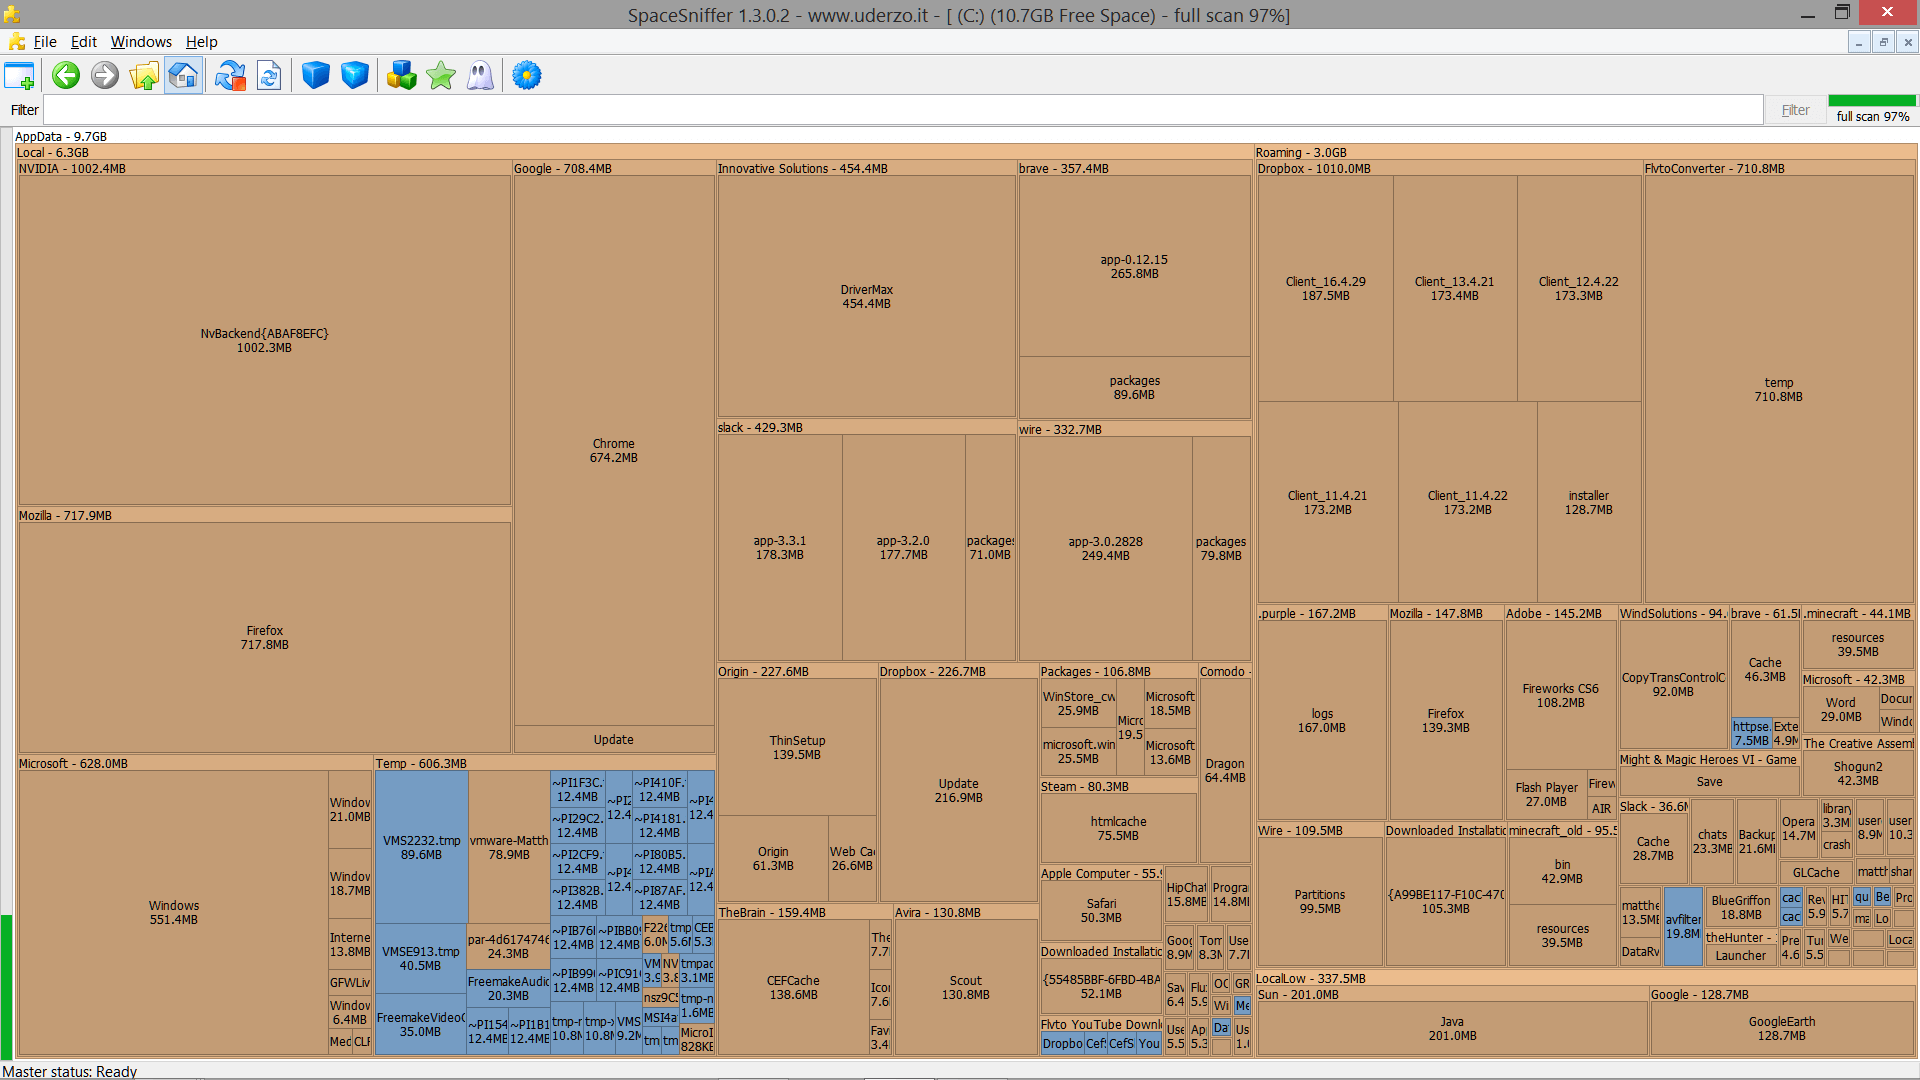
Places you might be able to regain some storage space:
- Mobile backups of your phone or tablet (Apple software occupied a lot of space)
- Files for unused web browsers, instant messengers and game clients
- Old OS drive images and other backup files
- Emails stored locally (especially attachments)
- File conversion software with media files stored in random locations (saved 710MB from an FlvtoConverter folder)
- Cloud storage software with files stored locally that you can remove (we had 1GB+ of old Dropbox files)
- Tools that auto-update your drivers (Driver Booster and Driver Max occupied well over a gig!)
- Unused virtual machines (we sometimes accidentally create VMs on C: instead of another drive)
- Temp folders everywhere (search for them via File Explorer one of the analyzer apps)
Move media files and software to another drive
Like scanning for junk files with Disk Cleanup or CCleaner, moving large video and other such files to a secondary storage device is somewhat of a given, but we're starting with the least extreme options.
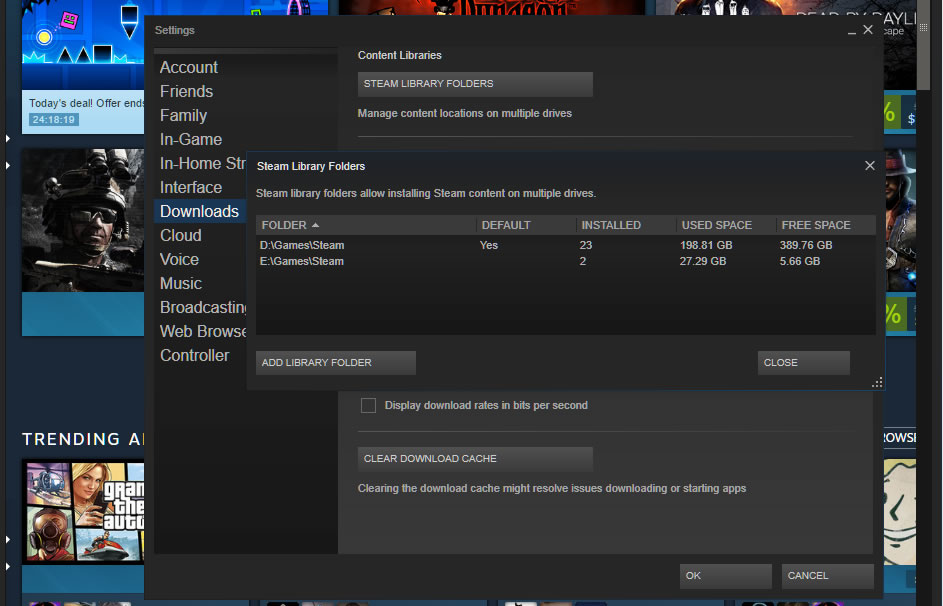
Moving Steam games to another drive or partition is a little more involved than copying a single file or folder and although third-party software used to be required for the process, Steam now provides the ability to store games on multiple drives:
Navigate to: Steam > Settings > Downloads > Steam Library Folders and make a new Steam library folder on the new drive, then right click on an already installed game in your Steam library and go to Properties > Local Files tab > Move install folder... > Choose the directory > Move folder.
You can also move other files to another drive and create a shortcut or a symbolic link to them, such as the ESD folder that we discuss later which contains a few gigs worth of files used for resetting Windows to its default state.
The Windows command mklink links one directory to another so that when software interacts with location A, it's redirected to location B. In the example of a PC game, Steam would think the game was in its original directory, but the files would instead run from a different drive. Here's a quick start guide for using mklink and some third-party software that lets you create links from a GUI instead of a command line:
- Create the folder where you'd like your new files to be
- Cut and paste the files from the old location to the new folder (don't leave the files behind)
- When the transfer finishes, open the Command Prompt and enter your mklink command (like this):
mklink /d "c:\files" "d:\files"
Command options for mklink:
/D Creates a directory symbolic link. Default is a file symbolic link
/H Creates a hard link instead of a symbolic link
/J Creates a Directory Junction
Link Specifies the new symbolic link name
Target Specifies the path (relative or absolute) that the new link refers to.
Clean unused system and driver files
Not long back we discussed methods for reclaiming several gigs on your storage drive by deleting the Windows.old backup folder that's created when reinstalling or upgrading Windows. The folder contains all the files from a previous Windows installation and can be deleted if you no longer need the data (or the folder can be moved to another drive).
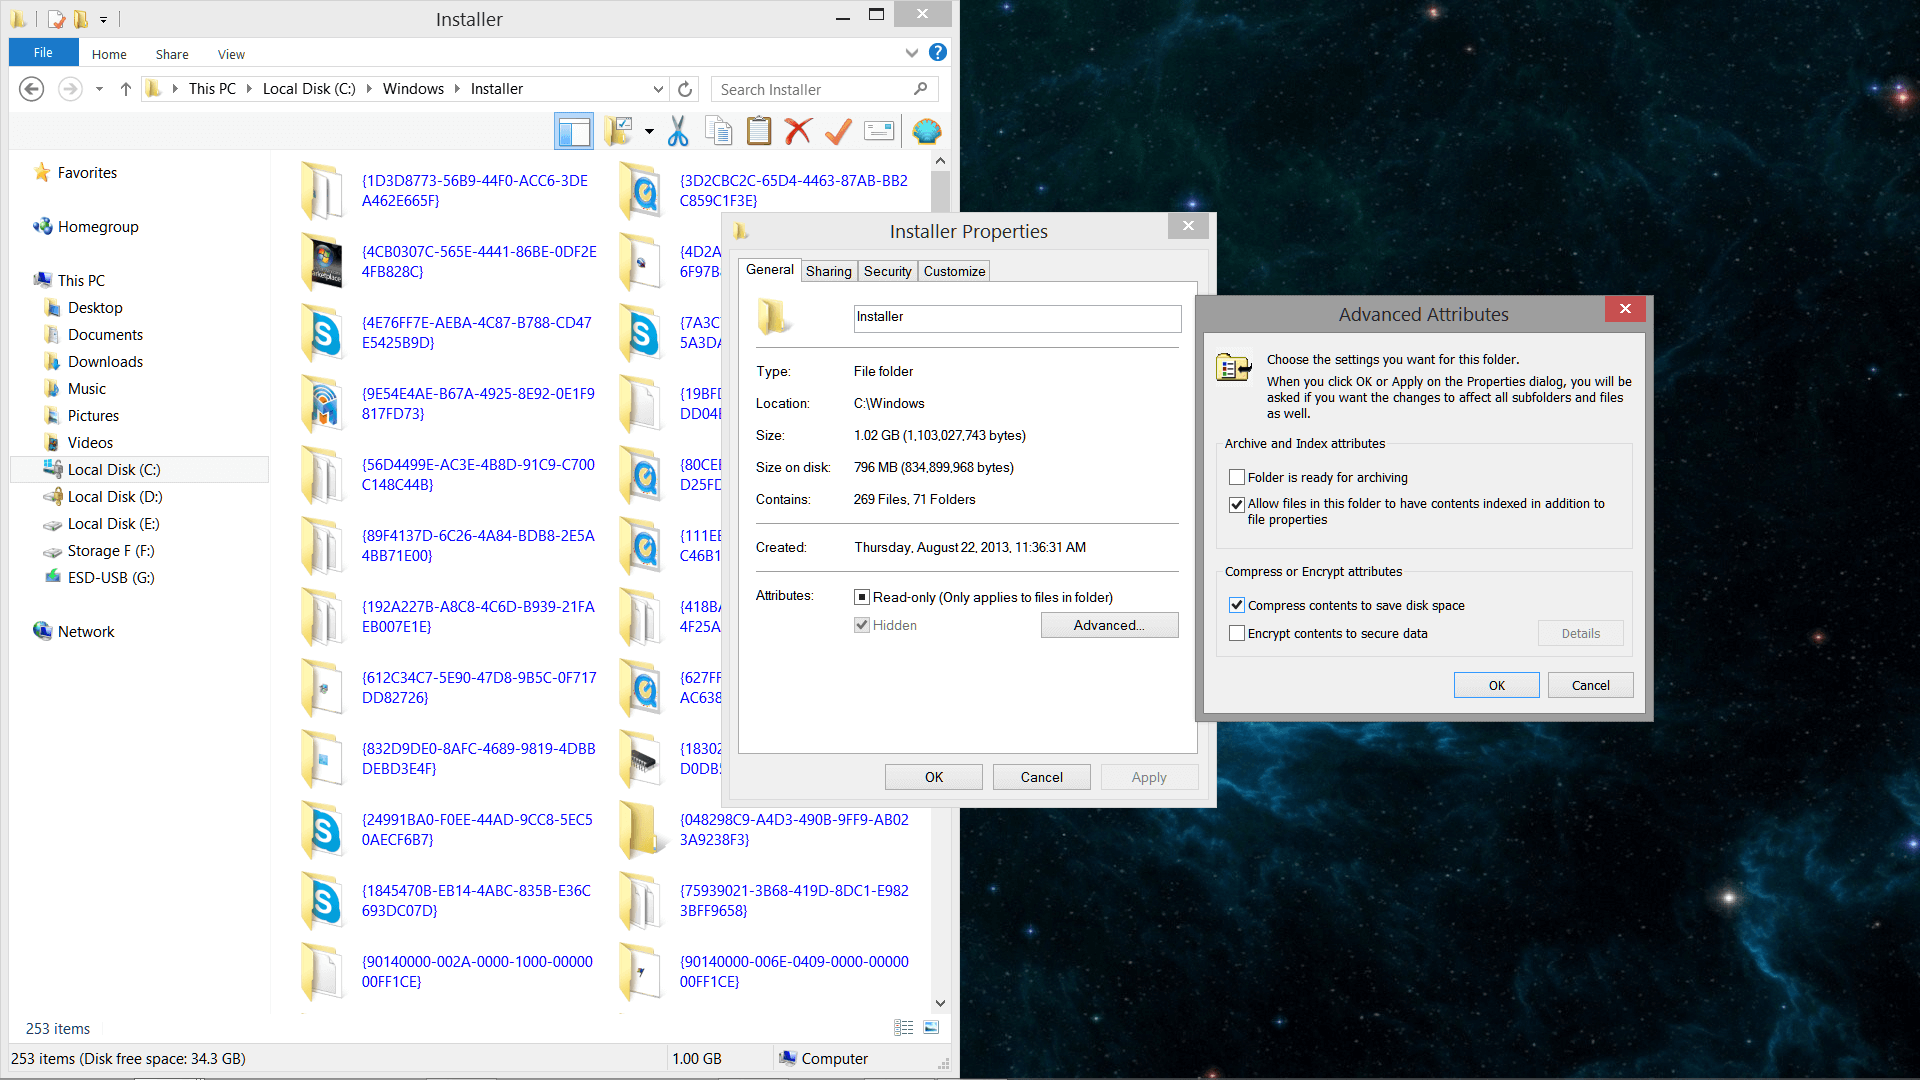
You can also save space on files and folders without deleting them by enabling Windows' built-in compression option: Right-click an item, go to Properties, click the Advanced button and check the box next to "Compress contents to save disk space" – click Ok twice to confirm/exit. Compressed files and folders will have blue text. Side note: Compression is undesirable for any system file or files that will be accessed even sporadically. Only use for archiving purposes.
Out of curiosity, we deleted a Windows account that was mostly new and unused to see how much storage would be freed and this didn't even recover 0.1GB but might be worthwhile for old accounts with a lot of data. Navigate to C:\Users, right-click the user folder for the account you want removed and delete it.
We also cleaned many other system and driver files from various locations around Windows 8.1 with results that ultimately reclaimed more than 4.5GB on our SSD, and that could have been well over 7GB if we deleted the ESD folder discussed in a moment.
System and driver files we tried to clean...
C:\Windows\System32\DriverStore\ - Occupied 4.3GB
Windows stores its installed drivers in the operating system's "DriverStore\FileRepository" folder, which can become cluttered with old driver files over time, especially for hardware such as graphics cards that recieve regular software updates.
We tried Command Prompt methods to automatically batch clean the DriverStore folder of all the drivers files not being used by Windows, but none of the commands worked except Microsoft's instructions for manually deleting them one by one. Fortunately, there's a third-party utility that lets you browse and delete unused driver files in the DriverStore
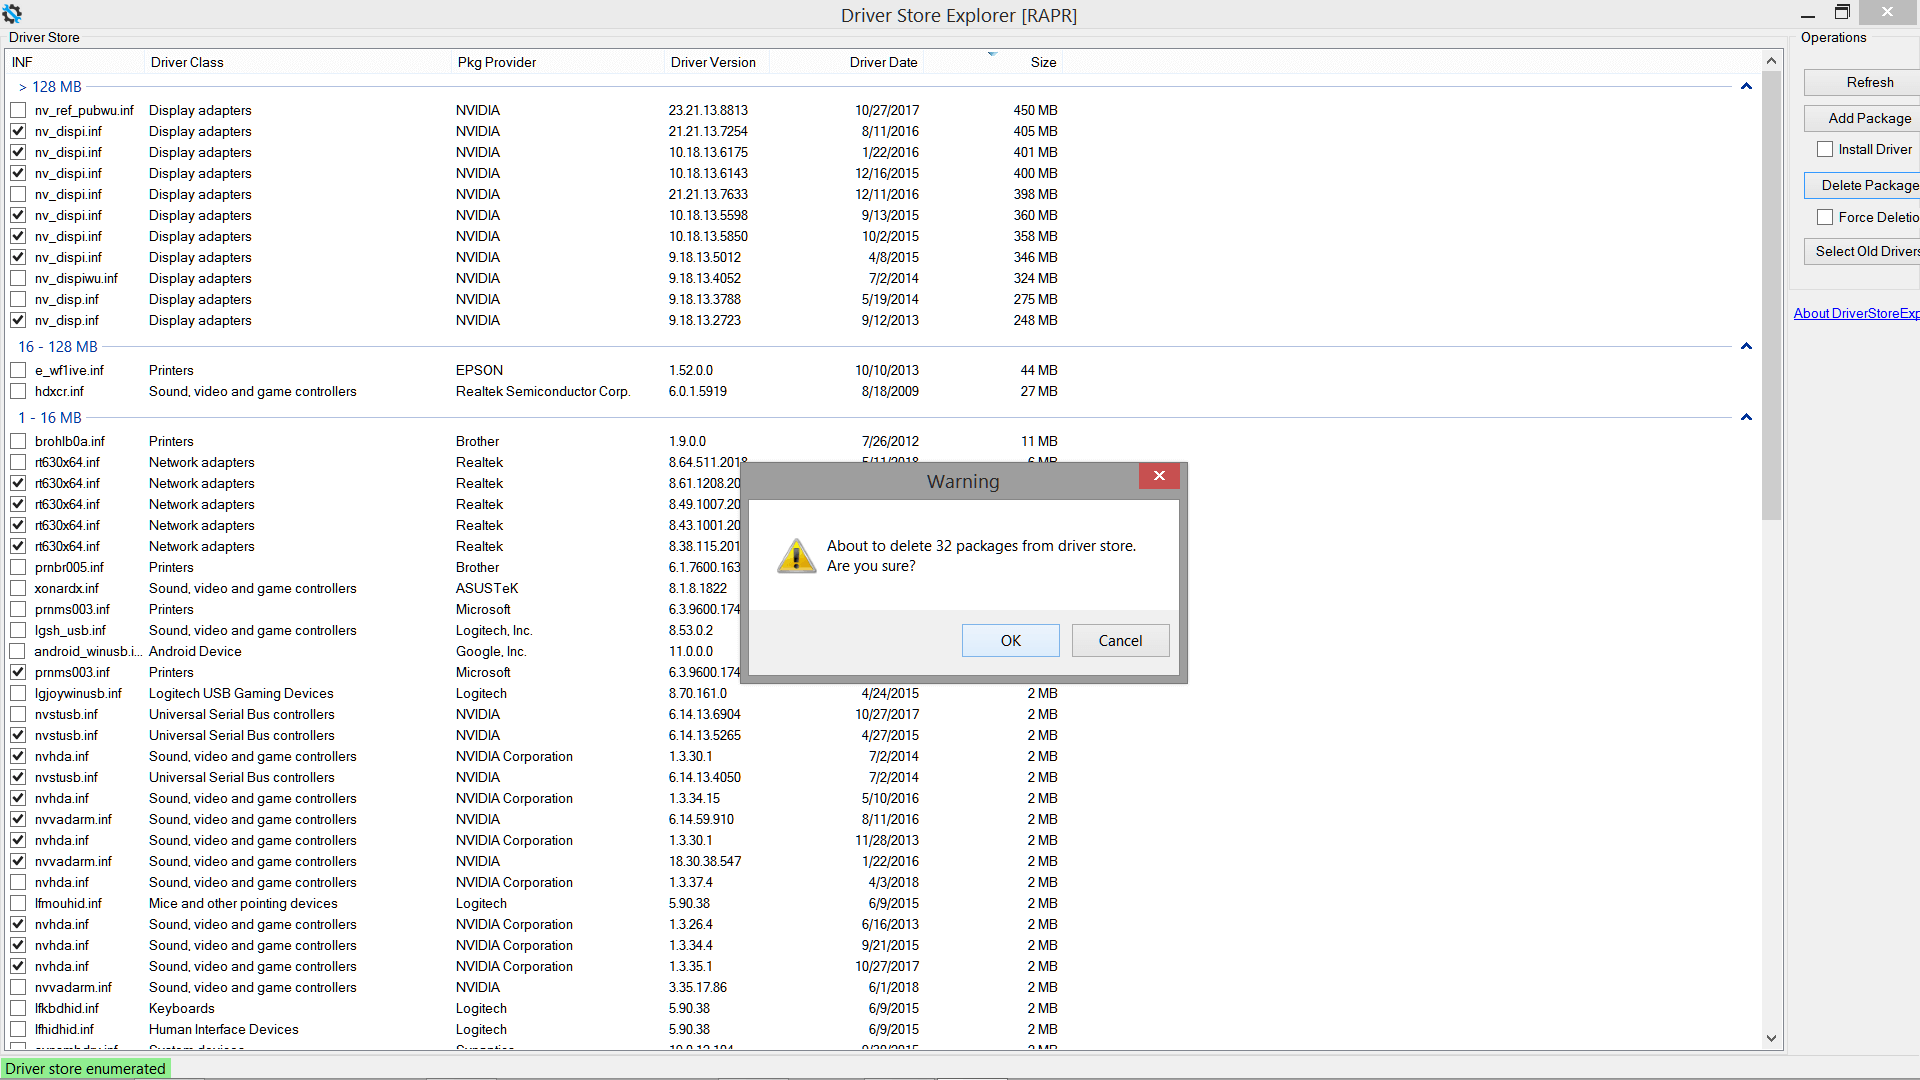
Driver Store Explorer loads all the cached drivers which you can filter by device type, manufacturer, driver version and even the size of the file, making it easy to find large drivers worth deleting. There's even a "Select Old Driver" button that will auto-check the boxes next to unused driver files, which can be deleted all at once.
Cleaning the DriverStore FileRepository folder with Driver Store Explorer released 2.6GB of space, most of which was Nvidia drivers...
C:\Windows\WinSxS - Occupied 7.56GB
WinSxS is the location for Windows Component Store files, which are used "to support the functions needed for the customization and updating of Windows," including operating system functions such as Windows Update installing new component versions, uninstalling a corrupt update as well as other system recovery operations. Microsoft has instructions for cleaning the unused components in this folder, which involves entering a command or two in an administrator Command Prompt.
The company says that the following command will remove previous versions of updated components, but when we tried this, the operation gradually occupied around a gig of space and then released that gig after completing without freeing up much if any space.
/online /Cleanup-Image /StartComponentCleanup
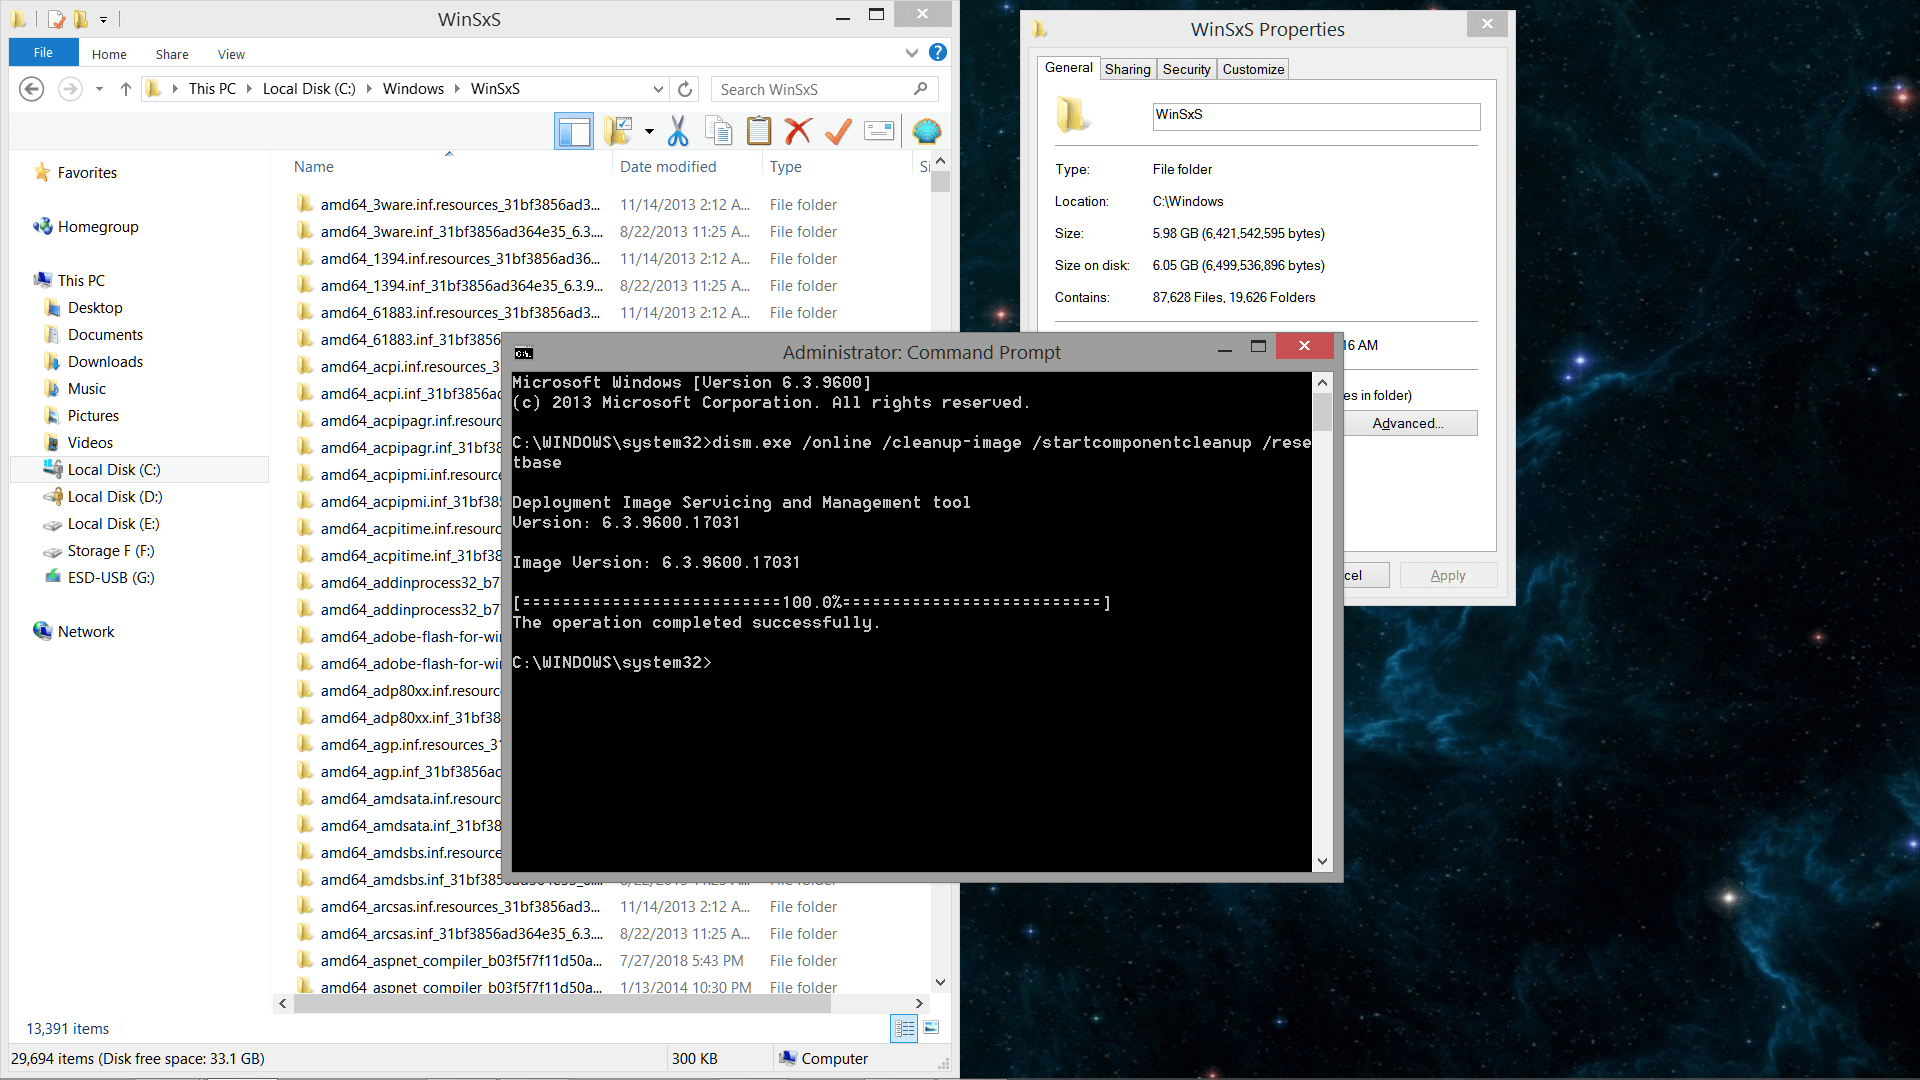
However, adding /resetbase to the end of that line (so, /online /Cleanup-Image /StartComponentCleanup /resetbase) will remove "all superseded versions of every component in the component store" and this managed to reduce the size of our WinSxS folder by nearly 2GB from 7.56GB to 5.98GB.
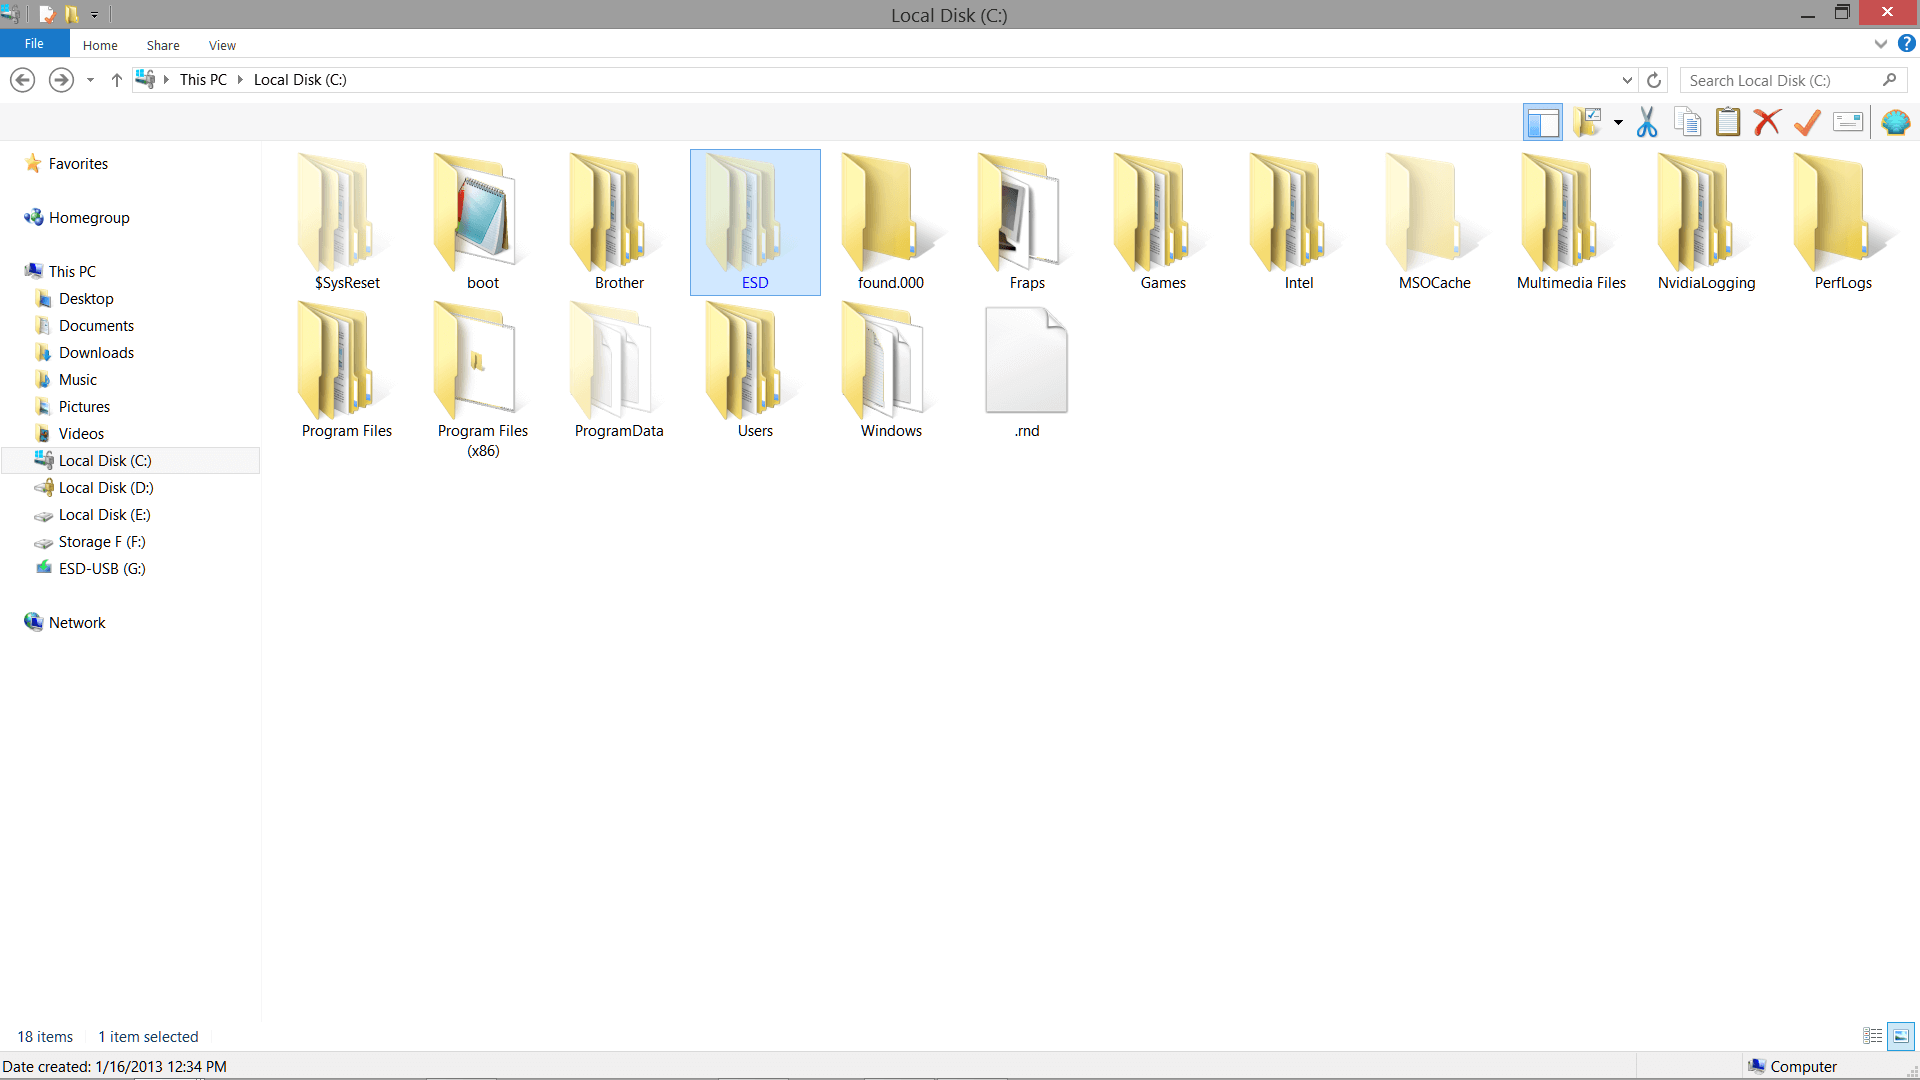
C:\ESD - Occupied 2.68GB
Microsoft recommends against deleting this folder because it's "used by Push Button Reset feature to reset your computer back to its original install state," in other words, files used for resetting Windows. That said, the folder can technically be deleted if you don't plan to use this feature or have already made an external USB recovery drive (search Start for Create a recovery drive) which will provide the same functionality.
Note that secondary system files scan in Disk Cleanup in Windows 10 may include the ESD folder as an option for deletion. We're doing the cleanup on Windows 8.1, but ESD can still be included with the instructions in the Disk Cleanup section above.
If you can't see the folder while browsing C:\ in the Windows File Explorer, go to View and check the box that enables "Hidden items."
Our machine did not need the extra space badly enough to delete the ESD folder.
C:\Windows\Installer - Occupied 1.1GB
This directory serves as a cache location for Windows installer based applications along with "stripped down versions of the Windows installer data files," according to Microsoft.
During application install, update of the application or application removal, this directory is used by the application to confirm the existence of previously installed items to determine the next steps the installer needs to take.
The company suggests that simply uninstalling a given application is the best way to clean its associated files from this folder.
C:\Program Files\Nvidia Corporation\Installer2 - Occupied 1.1GB
This location contains installation files from previous iterations of Nvidia's drivers and the company's web page about this folder says the contents of this folder can be deleted without affecting your currently installed drivers or software. "At most, it will prevent complete installs from occurring in the case of using an older driver from the OS driver store." We deleted all of the files in Installer2.
C:\Users\username\AppData\Local\Nvidia\NvBackend{ABAF8EFC}\ - Occupied ~1GB
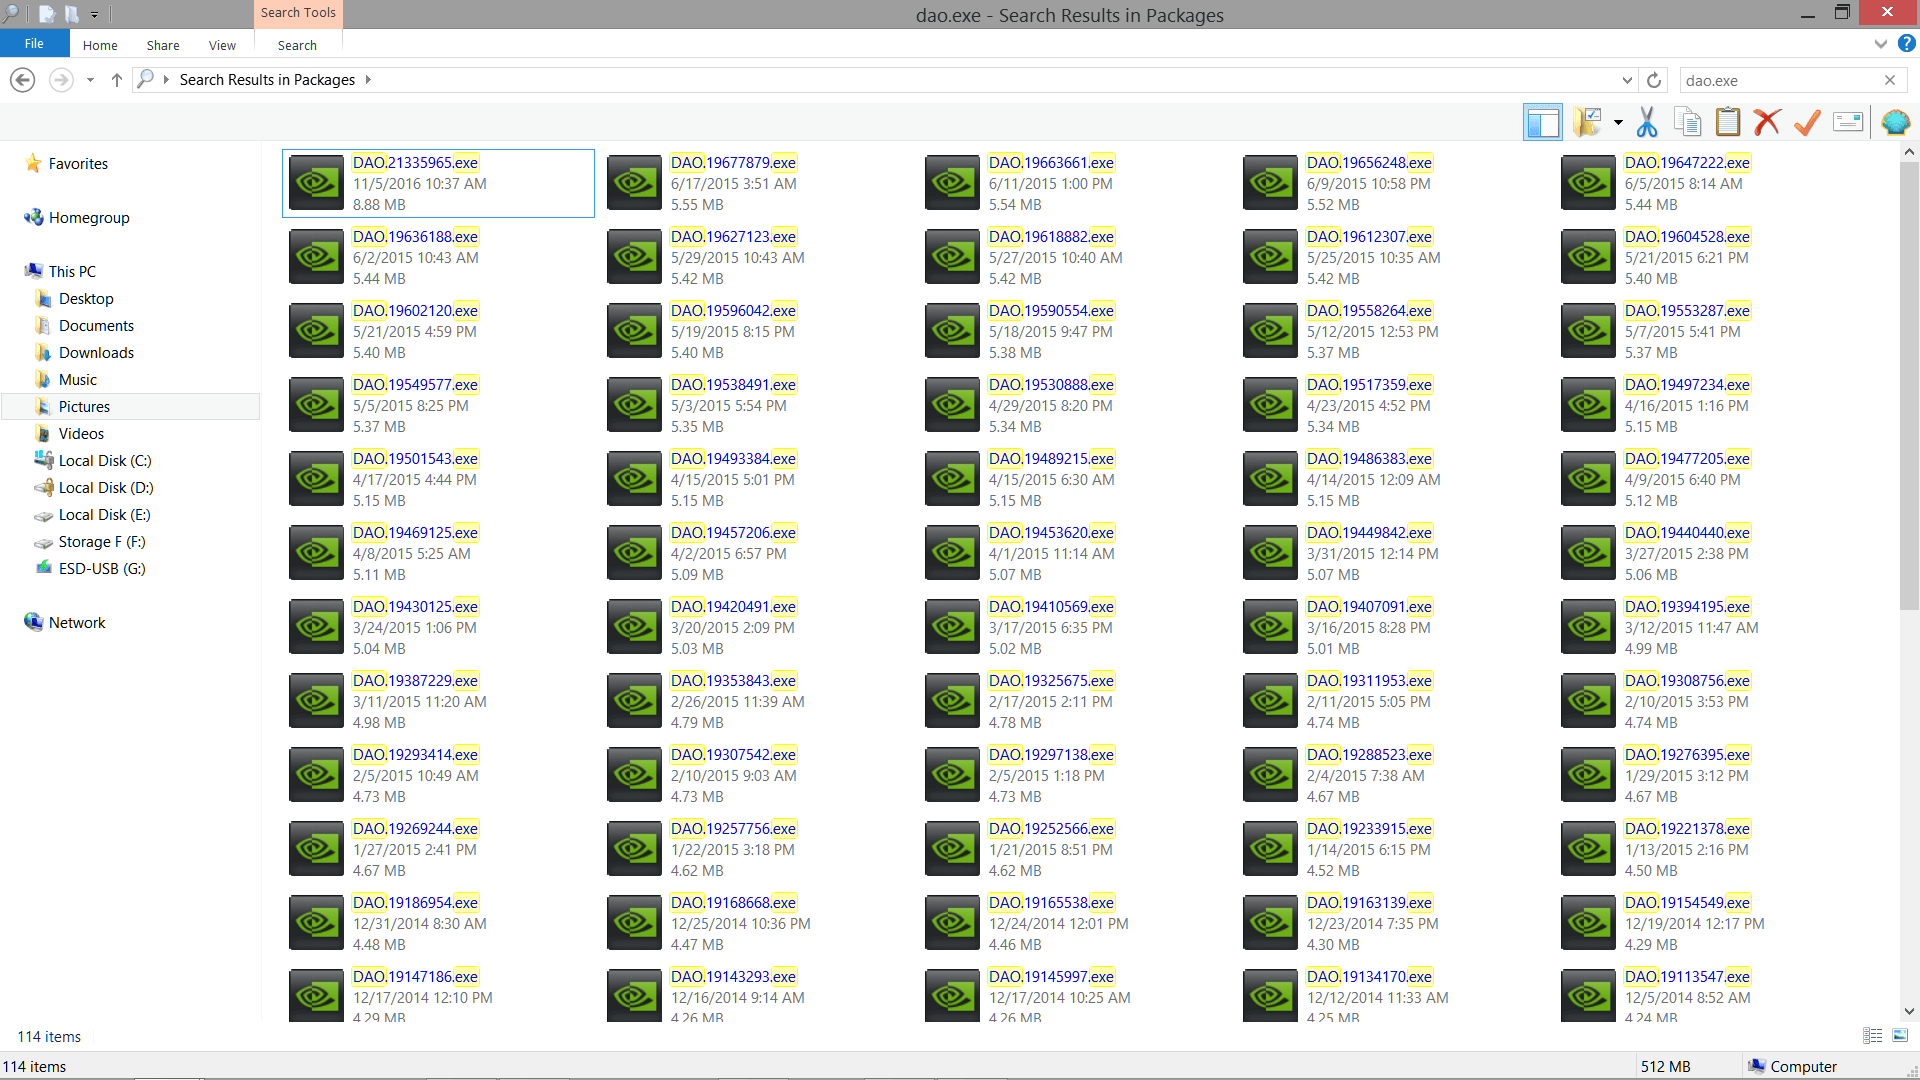
Nvidia's "NvBackend" folder took up nearly a gig, 830MB of which was in "Packages" and on our system this included 114 executable files named "DAO.insertrandomnumber.exe" that occupied 512MB of space. After much searching we couldn't determine if these files were safe to delete.
Proceed at your own risk...
Reduce Windows System Restore, hibernation & pagefile
These are the most extreme methods for recouping disk space on a Windows installation. While not recommended prior to trying the previously listed options, many gigabytes can be salvaged by making some advanced system tweaks.
Adjust your System Restore settings
Introduced with Windows ME, System Restore creates automatic backup files that can return your system, settings, programs and Windows Registry to a previous state. Depending on the size of your drive and the capacity percentage that System Restore is set to occupy, you may be able to reclaim several gigs by reducing the amount of storage it can use, deleting old restore points or disabling the feature altogether. To get started:
- Search Start or Run for sysdm.cpl
- Go to the System Protection tab
- Select your Windows drive and click Configure...
The window that opens will have a slider that you can adjust to change the maximum disk space that System Restore is allowed to consume on your drive – the less space you define, the more frequently old restore points will be deleted. You can also manually delete old restore points or disable the feature from the same window.
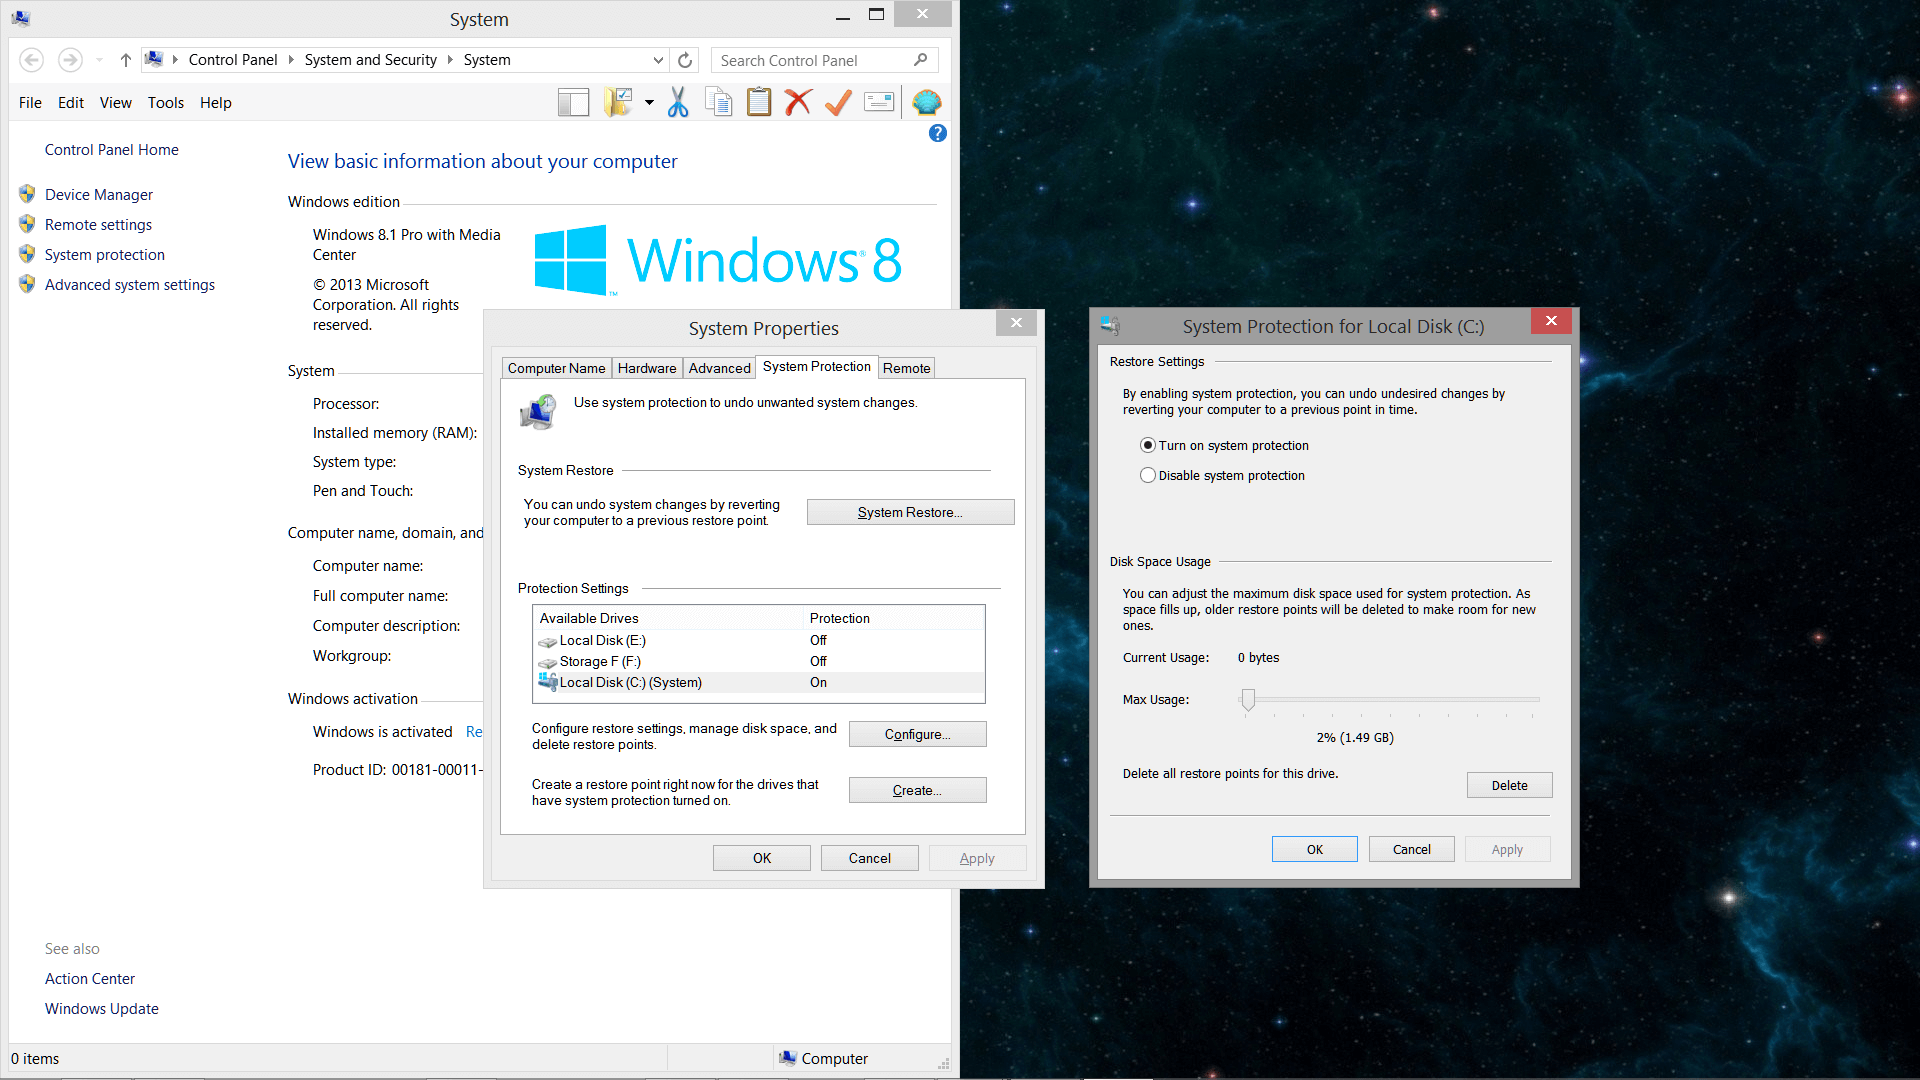
Restore points can be upwards of a gigabyte so somewhere around 2GB is probably the minimum you'd want in most situations, although we've been using 1.49GB (2% of our drive) for years with no issues. This seems to provide enough space for at least one restore point, which has spared us the trouble of reinstalling Windows once over the years.
Delete hiberfil.sys, disabling Windows hibernation
Hibernation writes your current system state to a non-volatile memory source such as your primary HDD or SSD, allowing you to turn off your system and restore your progress at a later date.
Turning on a system from hibernation is generally faster than starting from a cold boot and it doesn't require a constant power source like sleep, which stores data in RAM.
That said, if your operating system is on an SSD, load times should be sufficient and desktops are usually connected to a power source anyway, so using sleep instead is typcically fine.
Your hibernation file (hiberfil.sys) is probably occupying a few gigs to a dozen or more and the file can be purged from an elevated Command Prompt:
- Search Start or Run for cmd.exe
- Right-click on cmd.exe and choose Run as administrator
- Enter the following command: powercfg.exe -h off
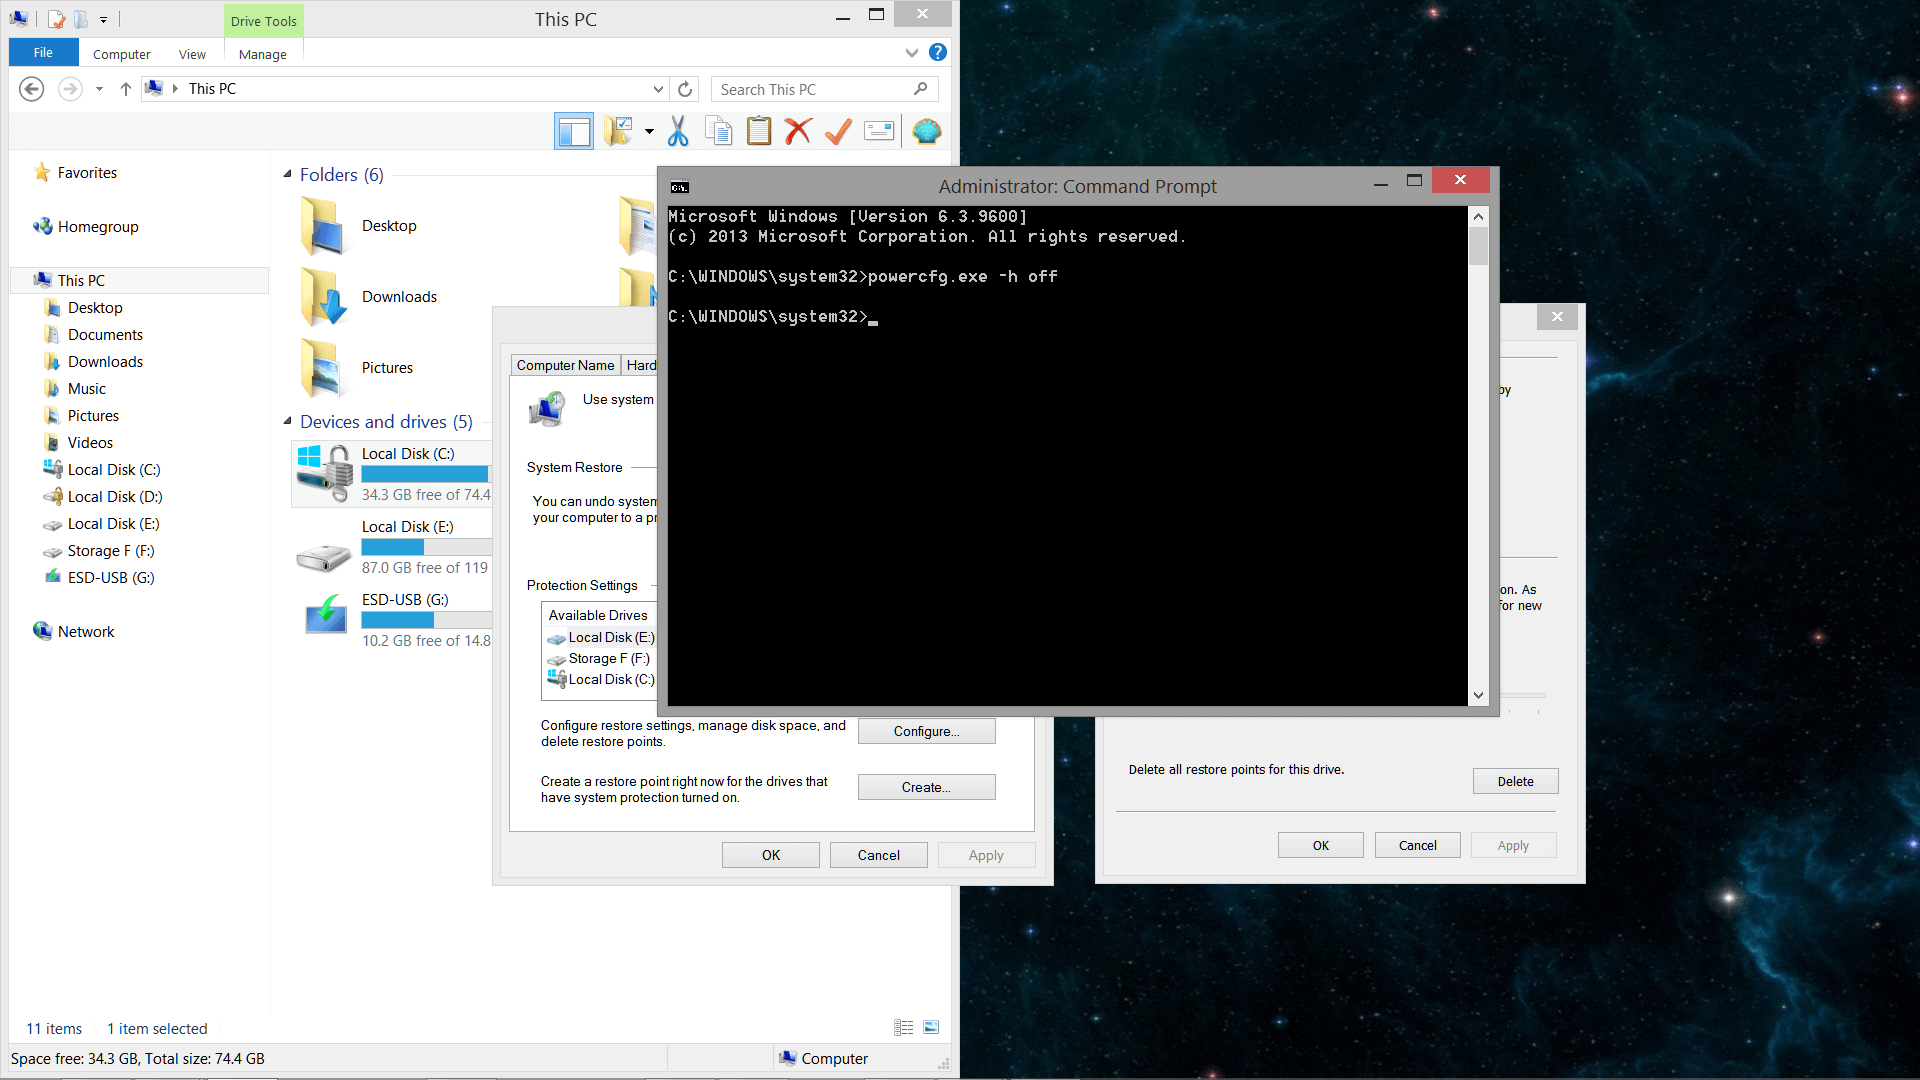
We already had hibernation disabled but re-enabling the feature consumed 12.8GB on our SSD.
Reduce or relocate your Windows page file
While not encouraged, you may be able to shrink or disable your page file (pagefile.sys), which allows Windows to use some of your drive space as system memory. The operating system can move infrequently used data from your RAM to the page file on your drive and the feature is particularly useful if you are running low on system memory.
By default, the Windows page file is configured to occupy many gigabytes on your system drive (3 x RAM or 4GB, whichever is larger) but if you have plenty of RAM or are confident that your system's performance won't be affected by reducing the size of your pagefile, the feature can be tweaked by navigating through these menus:
- Search Start or Run for sysdm.cpl (or right click This PC > Properties > Advanced system settings)
- Select the Advanced tab and then open Performance Settings
- Go to the Advanced tab (again) and click the Change button under Virtual memory
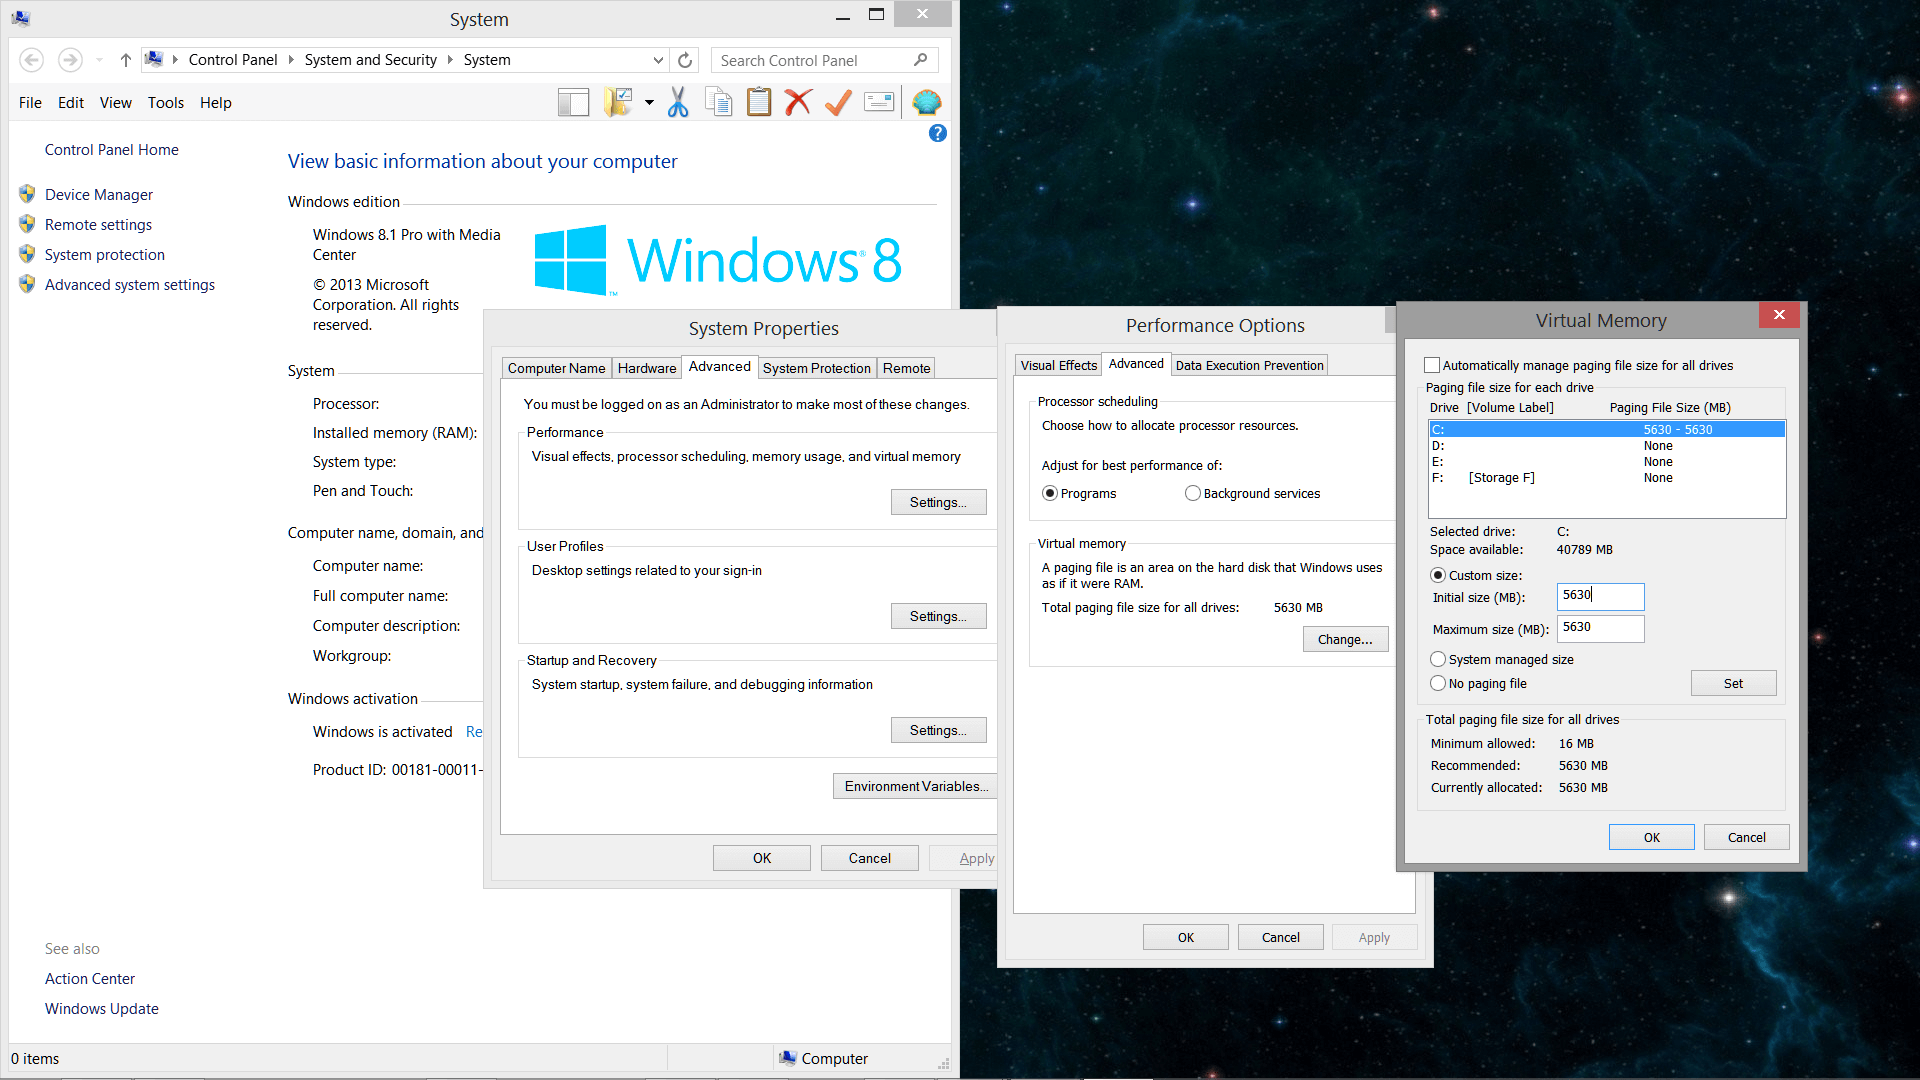
From the Virtual Memory window, uncheck the box for automatically managing your page file sizes, select your drive from the list and define a new custom size for the page file. Note that you can also move the page file to another drive from the same window...
- Select the drive with the page file from the list
- Click No paging file and then Set to disable the page file on this drive
- Select another drive and choose Custom size or System managed size to enable the page file elsewhere
As for how large your page file should be, Microsoft's definitive guide on the subject says there's no value that will work for every machine. However, the company suggests that adding some performance counters to the Windows Performance Monitor (perfmon.exe) will provide information which can be used as a baseline to determine the best page file size for your system. We reduced our page file from 5360MB to 4000MB.
A quick highlight reel of our drive cleanup
To recap, we've included some of the ways that we regained the 27GB on our Windows drive. This isn't a cheat sheet for the article because there are more methods above for cleaning your drive than we actually used, but we thought a play-by-play of our clean-out might be useful to someone in a similar situation.
Here's most of what we did:
- No longer use an Apple device, deleted everything Apple (including iTunes and Safari, mobile backups etc.) Had to manually delete 457MB worth of files at C:\Users\TechSpot\Music\iTunes and another 500MB of Apple data from C:\ProgramData. (+1.6GB storage space)
- Uninstalled other old unused software from Windows' built-in Add or remove programs utility. (+3.9GB)
- Manually deleting program files found via SpaceSniffer (Avira Scout for instance wasn't listed in add/remove programs along with other leftover files from uninstalled applications, not to mention a random VLC stream file and 710MB of files in an FlvtoConverter folder) (+many many gigs)
- Deleting the contents of this folder recovered several more gigs worth of storage: C:\Users\TechSpot\AppData\Local\Temp
- Scanned with Disk Cleanup – basic and advanced (+200MB)
- Scanned with Wise Disk Cleaner (+2.2GB)
- Deleted the contents of C:\Program Files\Nvidia Corporation\Installer2 (+1.1GB)
- Cleaned DriverStore folder with Driver Store Explorer (+2.42GB)
- Cleaned WinSxS folder via Command Prompt (+1.58GB)
- Compressed various folder around the operating system
- Reduced page file from 5360MB to 4000MB (+1.3GB)
- (Already had hibernation disabled and System Restore minimized)
- Final scans with Wise + a system reboot resulted in 37GB of free drive space, up from 10.5GB at the start of cleaning.
More Useful Tips
- Refresh Windows 10 to its default state in a few clicks, keeping your files and settings
- What Are the Best CCleaner Alternatives?
- How to Recover Data From a Corrupt ZIP File
- 12 Windows Clipboard Managers Tested
Masthead image credit: Cleaning an open computer hard drive by Amy Walters
